
For decades, the routine oil change has been a cornerstone of vehicle maintenance. It’s a simple task that directly impacts your engine’s health and longevity. Performing it yourself not only saves money but also gives you a better connection to your vehicle. With the right preparation and a clear process, anyone can confidently complete this essential job right in their own driveway.
Gathering Your Tools and Preparing Your Workspace
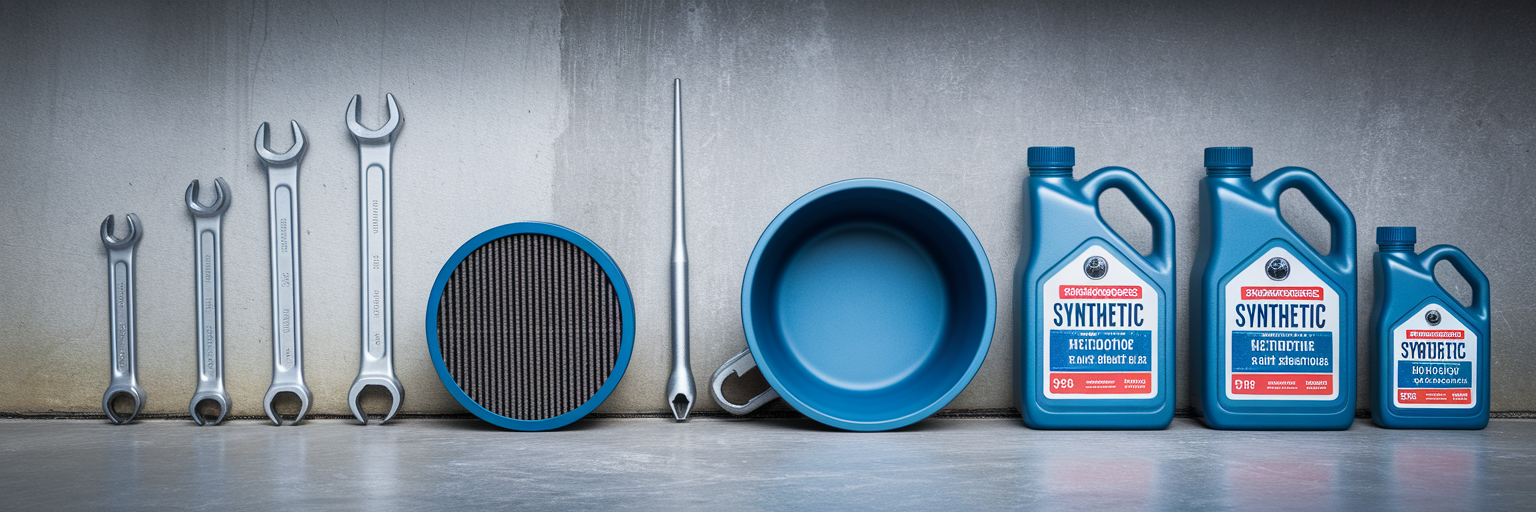
A successful oil change begins long before you loosen the first bolt. Proper preparation is what separates a smooth, 30-minute job from a frustrating afternoon of spills and setbacks. Having everything you need within arm’s reach turns the process into a clean, efficient routine rather than a chaotic scramble.
Essential Tools and Materials Checklist
Before you start, gather all the necessary tools for oil change to ensure you have everything on hand. There’s nothing worse than being halfway through the job and realizing you’re missing a crucial item. Here’s what you’ll need:
- Wrench Set: A socket set or combination wrenches to fit your vehicle’s drain plug.
- Oil Filter Wrench: This tool grips the oil filter, making it much easier to remove.
- Oil Drain Pan: To catch the old oil as it drains from the engine.
- Funnel: For pouring the new oil into the engine without making a mess.
- New Motor Oil and Oil Filter: The correct type and amount for your specific vehicle.
- Jack and Jack Stands: To safely lift and secure your vehicle.
- Gloves and Rags: To protect your hands and clean up any spills.
Safety First: Setting Up Your Work Area
Your safety is the absolute priority. Always work on a flat, level surface. This isn’t just for stability; it also ensures the old oil drains completely and you get an accurate reading from the dipstick later. While a car jack is used to lift the vehicle, never work under a car supported only by a jack. Once lifted, immediately secure it with a pair of sturdy jack stands placed at the manufacturer’s recommended support points. This simple step prevents a catastrophic failure.
Preparing the Vehicle for the Oil Change
To get the best results, you need to prepare the oil itself. Run the engine for just two to three minutes before you begin. This brief warmup lowers the oil’s viscosity, helping it flow out more quickly and carry more contaminants with it. However, be extremely careful. The engine and its components can get hot enough to cause severe burns, so let it cool for a few minutes before you start working. While the car is still on the ground, take a moment to locate the oil drain plug on the bottom of the oil pan and the oil filter. Your owner’s manual is the best guide for finding these parts. Regular maintenance like this can also help you diagnose other issues, such as figuring out why is my car squeaking when I drive.
Selecting the Correct Oil and Filter
Walking into an auto parts store can feel overwhelming with all the different oil options on the shelf. Choosing the right oil and filter is just as important as the change process itself. Using the wrong products can reduce performance and even harm your engine over time. This section will help you answer the question, what kind of oil for my car?
Decoding Oil Viscosity Grades
You’ve seen the labels: 5W-30, 10W-40, 0W-20. This code, known as the viscosity grade, simply describes how the oil flows at different temperatures. Think of it like honey; it’s thick and slow when cold but flows easily when warm. The first number with the “W” indicates its flow rate in winter, while the second number represents its flow rate at operating temperature. These viscosity grades and performance standards are defined by the American Petroleum Institute (API), ensuring the oil meets specific quality benchmarks. The most important rule is to always use the viscosity grade recommended by your vehicle’s manufacturer. It’s engineered specifically for your engine.
Synthetic vs. Conventional Oil: Making the Right Choice
The debate over synthetic vs conventional oil comes down to performance, protection, and price. Conventional oil is refined from crude oil and provides basic protection suitable for many older, simpler engines. Full synthetic oil is chemically engineered to offer superior performance, better resistance to heat and breakdown, and longer change intervals. For modern engines, especially those with turbochargers or direct injection, full synthetic is often a requirement, not just a suggestion. A modern truck like one of our 2025 Ford F-150 often requires full synthetic oil to protect its advanced engine components.
| Oil Type | Performance & Protection | Cost | Recommended Change Interval |
|---|---|---|---|
| Conventional | Basic protection against wear and deposits. Suitable for older, low-mileage engines. | $ | 3,000 – 5,000 miles |
| Synthetic Blend | Improved protection and performance over conventional. Good for moderate driving conditions. | $$ | 5,000 – 7,500 miles |
| Full Synthetic | Maximum protection against heat, deposits, and wear. Essential for high-performance and turbocharged engines. | $$$ | 7,500 – 15,000+ miles |
Note: These change intervals are general guidelines. Always consult your vehicle’s owner’s manual for the manufacturer’s specific recommendations, as driving habits and engine type can affect the ideal frequency.
Finding the Right Oil Filter and Capacity
The oil filter is your engine’s last line of defense, trapping harmful particles before they can cause damage. A cheap, low-quality filter can compromise even the best synthetic oil. Auto parts stores have catalogs or digital lookups where you can find the exact part number for your vehicle’s make, model, and year. Finally, consult your owner’s manual to find the precise oil capacity. This is critical for preventing under-filling or, worse, over-filling, which can damage engine seals.
The Step-by-Step Draining Process
With your workspace prepared and materials selected, it’s time to get your hands dirty. This part of the process is all about carefully removing the old, contaminated oil from your engine. Following these DIY oil change steps methodically will ensure a clean and complete drain, setting the stage for fresh oil to do its job. If you follow these steps carefully, your engine should run smoothly, but if you ever face a situation where the engine won’t turn over, it’s helpful to know why wont my car start.
Positioning the Pan and Loosening the Plug
- Slide the oil drain pan directly under the drain plug. Make sure it’s positioned to catch the initial stream, which can shoot out a few inches.
- Using your socket or combination wrench, turn the drain plug counter-clockwise to loosen it. Often, it just needs a firm tug to break the seal.
- Once it’s loose, unscrew the plug the rest of the way by hand. This gives you better control and helps prevent the plug from dropping into the pan of hot oil.
Managing the Oil Flow
- As you remove the plug, pull it away quickly. The old oil will begin to drain immediately.
- Let the oil drain completely. This is a step where patience pays off. Give it at least 10 to 15 minutes to allow as much of the old, dirty oil and suspended contaminants to drip out as possible.
- While it drains, inspect the drain plug. Look for any damage to the threads.
Cleaning and Reinstalling the Drain Plug
- Wipe the drain plug clean with a rag and replace the old gasket or washer if it has one. Many manufacturers recommend a new gasket with every oil change to ensure a perfect seal.
- Once the oil has slowed to a slow drip, wipe the area around the drain plug opening on the oil pan.
- Start threading the drain plug back in by hand. This is crucial to prevent cross-threading, which can ruin the oil pan.
- After hand-tightening, use your wrench to snug it up with a final quarter-turn. Do not over-tighten, as this can strip the threads.
Replacing the Filter and Adding New Oil

Now that the old oil is out, the next phase of your DIY project is replacing the filter and refilling the engine with fresh lubricant. Knowing how to change car oil properly includes giving the filter the attention it deserves. This is where many beginners make small but significant mistakes. For instance, a sophisticated SUV like one of our 2026 Jeep Grand Cherokee has precise oil and filter requirements that are crucial for its longevity and performance.
Removing the Old Oil Filter
- Before you start, move the drain pan underneath the old oil filter. It will still contain some oil that will spill out upon removal.
- Try to unscrew the filter by hand first. If it’s too tight, use your oil filter wrench to loosen it.
- Once loose, unscrew it slowly, allowing the trapped oil to drain into the pan. Once removed, tip it upside down into the pan to empty it completely.
Preparing and Installing the New Filter
- Take a small amount of new oil on your fingertip and apply a thin coat to the rubber gasket on the new filter. This simple step is vital; it lubricates the gasket, ensuring a tight seal and preventing it from sticking or tearing during installation.
- Carefully screw the new filter onto the engine by hand until the gasket makes contact with the mounting surface.
- From that point, tighten it an additional three-quarters of a turn by hand. Do not use the wrench to tighten the new filter, as over-tightening can damage the filter or its seal.
Filling the Engine with Fresh Oil
- Remove the oil filler cap on top of your engine and place a funnel in the opening.
- Pour in the new oil, but stop about one quart short of the total capacity listed in your owner’s manual.
- Wait a minute for the oil to settle, then pull out the dipstick, wipe it clean, reinsert it fully, and pull it out again to check the level.
- Continue adding small amounts of oil and rechecking the dipstick until the level reaches the “full” mark. This prevents overfilling. Replace the oil filler cap securely.
Responsible Disposal and Final Checks
You’re almost done. The final steps are just as important as the first, involving responsible cleanup and a thorough verification of your work. This ensures your vehicle is ready for the road and that you’ve handled the waste materials correctly, completing the job like a professional.
Safely Transferring and Storing Used Oil
The first question to address is how to dispose of used motor oil. Used oil is classified as hazardous waste and is harmful to the environment. Never pour it down a drain, into the sewer, or onto the ground. Using your funnel, carefully pour the old oil from the drain pan into a sealable container. The empty bottles from your new oil work perfectly for this. Make sure the container is sealed tightly to prevent leaks during transport.
Finding a Local Used Oil Recycling Center
Fortunately, recycling used motor oil is easy and often free. Most national auto parts retailers in the U.S., such as AutoZone and O’Reilly Auto Parts, accept used motor oil from the public at no charge. You can also check with your local municipal recycling center or public works department, as many offer collection sites for household hazardous waste. Improper disposal is not only harmful but also illegal in many areas. According to the Environmental Protection Agency (EPA), a single oil change can contaminate one million gallons of fresh water, making recycling essential.
Performing the Final Leak Check and Cleanup
With everything buttoned up, it’s time for the final check. This quick routine confirms your work is solid.
- Start the engine and let it run for about 60 seconds. This circulates the new oil through the engine and filter.
- While the engine is running, look under the vehicle for any signs of leaks around the drain plug and the new oil filter.
- Shut off the engine and wait 5 to 10 minutes for the oil to settle back into the pan.
- Perform one last check of the dipstick to ensure the oil level is still at the “full” mark and top it off if needed.
Wipe down any tools and spills, and you’re finished. You’ve just saved money and gained valuable hands-on experience with your vehicle. Now that you’ve mastered this essential skill, stay updated on all the latest automotive developments by checking out our car news section.