Most people think the hardest part of a DIY car battery replacement is the physical work. The reality is that the most critical moments happen before you even touch a wrench. Proper preparation is what separates a smooth, twenty-minute job from an afternoon of frustration and potential damage to your vehicle’s electronics. Getting this first step right ensures everything else falls into place.
Preparation and Safety First
Before you begin, remember that a car battery contains corrosive acid and can release flammable hydrogen gas. It also powers sensitive electronics. Approaching the task with caution and the right equipment is not just a suggestion, it is a requirement for doing the job correctly and safely.
Gathering the Essential Tools and Materials
You wouldn’t start cooking without your ingredients, and the same principle applies here. Having all your tools for changing car battery within arm’s reach prevents you from leaving the job halfway through to find a missing wrench. It’s about efficiency and, more importantly, maintaining a safe and controlled workspace.
| Tool | Primary Purpose | Pro-Tip |
|---|---|---|
| Wrench or Socket Set | To loosen and tighten terminal clamps and the hold-down bracket. | An adjustable wrench works, but a socket set with an extension is often easier. |
| Safety Glasses | To protect eyes from acid splashes or accidental sparks. | Wear them throughout the entire process, from start to finish. |
| Insulated Gloves | To protect hands from corrosive acid and prevent accidental short circuits. | Nitrile or rubber gloves are ideal. |
| Wire Brush / Terminal Cleaner | To scrub corrosion from battery terminals and cable clamps. | A dedicated terminal cleaning tool is inexpensive and highly effective. |
| Baking Soda and Water | To create a paste that neutralizes and cleans away acid corrosion. | Apply with an old toothbrush for best results. |
| Computer Memory Saver (Optional) | To provide temporary power to the vehicle’s ECU and retain settings. | Essential for many cars made after 2010 to avoid resetting radio codes and driveability parameters. |
Selecting the Correct Replacement Battery
Not all batteries are created equal. Your vehicle’s manufacturer has specific requirements for a reason. Check your owner’s manual for the recommended specifications, paying close attention to the Cold Cranking Amps (CCA) and Reserve Capacity (RC). The CCA rating tells you how well the battery can start your engine in cold weather, while the RC indicates how long it can run essential systems if the alternator fails. Getting these wrong can lead to poor performance or a battery that doesn’t fit. Specifications can vary significantly, even for popular models like the 2025 Ford F-150.
Prioritizing Personal Safety Measures
We cannot stress this enough: wear your safety glasses and gloves. A car battery contains sulfuric acid, which can cause serious chemical burns. It can also produce hydrogen gas, which is highly explosive. A single spark near the battery could have dangerous consequences. Always work in a well-ventilated area, like an open garage or driveway, to allow any gases to dissipate safely.
Considering a Computer Memory Saver
In cars from the last decade, disconnecting the battery is like unplugging your home computer. The vehicle’s electronic control unit (ECU) can lose its memory, resetting everything from your radio presets and clock to important engine and transmission learning parameters. A computer memory saver is a small device that plugs into your car’s OBD-II port or cigarette lighter, providing just enough power to keep these settings intact while you work.
Disconnecting the Old Battery
With your tools and safety gear ready, it’s time to begin the disconnection process. The order in which you disconnect the cables is the most important safety rule in this entire guide. Following the correct car battery connection order prevents accidental sparks that could damage your car’s electronics or ignite hydrogen gas.
Locating Your Vehicle’s Battery
The first step is finding the battery. While it is usually under the hood, some manufacturers place it in the trunk or even under a seat to improve weight distribution. If you open the hood and don’t see it, consult your owner’s manual. This is common in various makes, and knowing the layout of brands like Honda can save you time.
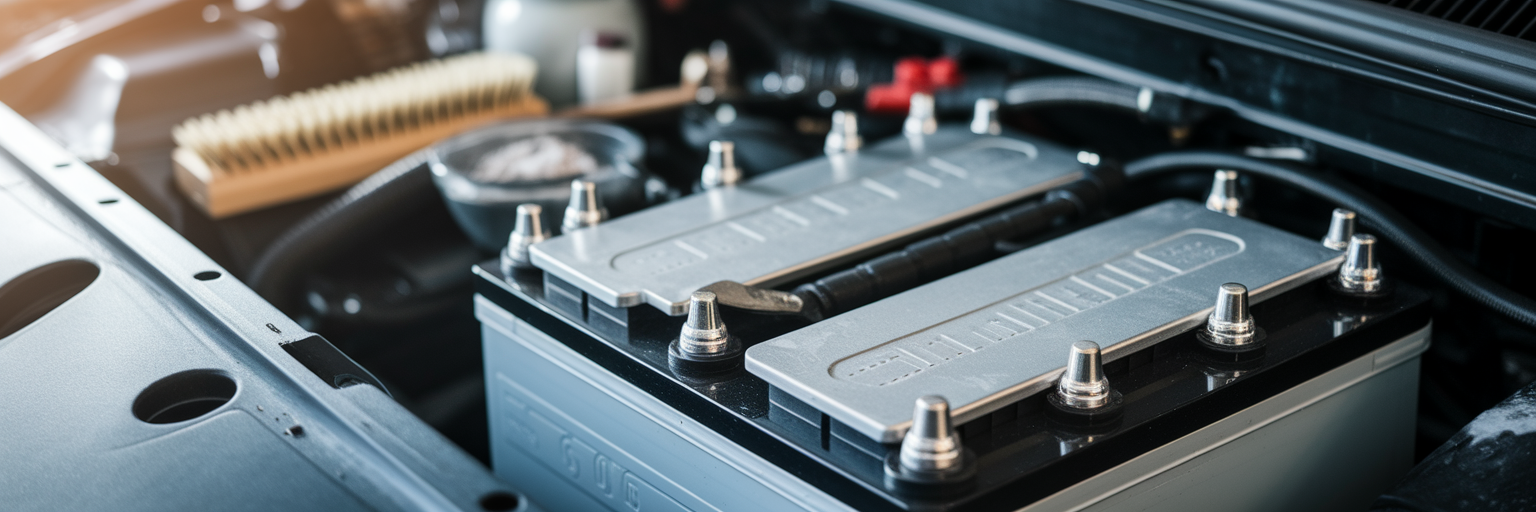
Identifying the Positive and Negative Terminals
Once you locate the battery, you will see two connection points, or terminals. The positive terminal is marked with a plus sign (+) and often has a red plastic cover. The negative terminal is marked with a minus sign (-) and is usually connected to a black cable. Take a moment to confirm you have identified them correctly.
The Critical Disconnection Sequence: Negative First
Always disconnect the negative terminal first. Why? Your car’s metal frame acts as the negative “ground” for the entire electrical system. If you were to loosen the positive terminal first, your wrench could accidentally touch a metal part of the engine or chassis. This would complete the circuit, creating a powerful and dangerous spark. By disconnecting the negative cable first, you break the ground circuit entirely, making the process much safer. As automotive authority RAC advises, “THE FIRST STEP IS TO MAKE SURE THAT THE ENGINE IS OFF AND KEYS ARE REMOVED FROM THE ENGINE” before you touch anything.
- Use your wrench to loosen the nut on the negative terminal clamp. You only need to loosen it enough to wiggle the cable off.
- Once loose, pull the cable clamp off the terminal post and tuck it away to the side, ensuring it cannot accidentally touch the battery again.
Proceeding to the Positive Terminal
With the negative cable safely disconnected, the circuit is broken. You can now repeat the exact same process for the positive terminal without the risk of accidental sparks. Loosen the nut, remove the cable clamp, and set it aside.
Removing the Old Battery and Cleaning the Area
Now that the battery is electrically isolated, you can focus on the physical task of removing it. This stage is less about electrical risk and more about careful handling and cleaning. A clean battery tray and terminals are essential for the health and longevity of your new battery.
Releasing the Battery Hold-Down Bracket
The battery is secured in place by a hold-down bracket or clamp. This is typically a small metal bar at the base or top of the battery, held down by one or two long bolts. Use your socket set or wrench to remove these bolts and set the bracket aside. You will need it to secure the new battery.
Safely Lifting the Battery Out
Be prepared for the weight. A typical car battery weighs between 15 and 25 kilograms, which can be surprisingly heavy. Bend your knees and lift with your legs, not your back, to avoid injury. Lift the battery straight up and out of the tray, and place it on a stable surface on the ground, away from your work area.
Inspecting and Cleaning the Battery Tray
With the battery removed, inspect the tray for corrosion. You will likely see a white, powdery substance, which is dried battery acid. This corrosion can eat away at the metal tray over time. To neutralize it, create a paste with baking soda and a little water. Apply it to the corroded areas with an old toothbrush. You will see it fizz as it neutralizes the acid. Once it stops fizzing, wipe the area clean with a damp cloth and dry it thoroughly.
Scrubbing the Cable Terminals
A solid electrical connection depends on clean, metal-to-metal contact. Use a wire brush or a dedicated battery terminal cleaning tool to scrub the inside of both the positive and negative cable clamps. Your goal is to remove all corrosion and grime until you see shiny, bare metal. This simple step is one of the most overlooked parts of a DIY car battery replacement, yet it is crucial for reliable starting.
Installing the New Battery
With a clean tray and shiny terminals, you are ready to install the new battery. The connection process is the reverse of disconnection, and the order is just as important. Following the correct sequence here is the final step to safely replace car battery and ensure a perfect connection without any risk.
Positioning the New Battery Correctly
Carefully lower the new battery into the battery tray. Take a moment to orient it correctly, ensuring the positive terminal on the battery aligns with the positive cable, and the negative terminal aligns with the negative cable. Placing it backward is a common mistake that can cause serious electrical damage if you try to connect the cables.
Securing the Battery in Place
Reinstall the hold-down bracket you removed earlier. Tighten the bolts until the battery is snug and does not move when you push on it. Do not overtighten, as this can crack the battery’s plastic casing. It just needs to be firm enough to prevent it from vibrating or shifting while you drive.
The Reverse Connection Sequence: Positive First
Now for the critical connection order. You must connect the positive terminal first. With the negative (ground) cable still disconnected, there is no complete circuit. This means that if your wrench accidentally touches the car’s metal frame while you are tightening the positive clamp, nothing will happen. There is no path for the electricity to flow, so no spark will be created. This is the safest way to re-establish the connection. As Kia’s official guide states, you should “Connect the new battery in the reverse order, positive then negative.”
- Place the positive cable clamp onto the positive terminal post.
- Tighten the nut with your wrench until it is snug. You should not be able to twist the clamp by hand.
Completing the Circuit with the Negative Terminal
With the positive side secure, you can now complete the circuit. Place the negative cable clamp onto the negative terminal and tighten it firmly. As a final professional touch, you can apply a thin layer of anti-corrosion grease or spray to both terminals. This helps prevent future corrosion buildup and ensures a solid connection for years to come.
Final Checks and Responsible Disposal

The new battery is in, but the job is not quite finished. A few final checks will confirm your work was successful, and proper disposal of the old battery is a responsibility you should not overlook. This final step ensures your vehicle is ready and you have completed the task in an environmentally conscious way.
Testing Your Work
Before closing the hood, perform a quick systems check. Get in the car and start the engine. It should turn over crisply. Once it is running, check that your headlights, interior lights, and radio are all functioning correctly. If you did not use a memory saver, you will likely need to reset your clock and radio presets.
The Environmental Importance of Battery Recycling
A car battery is an environmental hazard. It contains lead, sulfuric acid, and other toxic materials that can contaminate soil and groundwater if sent to a landfill. It is illegal in most regions and always irresponsible to dispose of old car battery in your regular household trash. We believe that responsible ownership extends to the entire lifecycle of a vehicle’s parts.
How and Where to Recycle Your Old Battery
Fortunately, recycling a car battery is simple. Nearly every auto parts store or service center that sells batteries is required to accept old ones for recycling. In many cases, you will receive a credit or a refund of the “core charge” you paid when you purchased the new battery. Alternatively, your local municipal recycling center or hazardous waste facility will also accept them. After a successful installation, you can explore more about vehicle care on our homepage.
Troubleshooting Common Post-Installation Issues
Sometimes, even after following every step of this guide on how to change a car battery, you might encounter a small issue. Do not worry, these are usually easy to fix and are common for first-time DIYers. Here are the most frequent problems and their solutions.
- The car won’t start or just clicks. This is almost always caused by a poor connection. The clamps may feel tight, but if they are not on clean metal, they will not conduct electricity properly. Turn the engine off, re-check that both terminals are clean and shiny, and tighten the clamps again. If the problem persists, it could be a sign of other issues, and you can learn more about why your car won’t start.
- The radio is asking for a code. If you did not use a computer memory saver, this is normal. The security code can usually be found in your owner’s manual or on a small card that came with it. Some manufacturers allow you to retrieve it online.
- Warning lights are on the dashboard. It is common for lights like the check engine or traction control light to appear after the battery has been disconnected. The car’s computer is simply recalibrating. In most cases, these lights will turn off on their own after a few minutes of driving.