That moment when you turn the key and hear a weak click instead of your engine roaring to life is a familiar feeling for many drivers. While it can be frustrating, a dead battery is one of the most straightforward DIY fixes you can perform. Knowing how to change a car battery not only saves you time and money but also gives you a valuable piece of self-reliance. With the right preparation and a clear set of instructions, you can handle this job confidently and safely.
Gathering Your Tools and the Right Battery
A successful battery replacement begins long before you pop the hood. Having everything you need laid out and ready transforms the task from a frustrating puzzle into a smooth, predictable process. Think of it like cooking a meal; you gather your ingredients before you start. First, let’s cover what tools to change car battery you will need. Most of the required items are common in a basic home toolkit, with a couple of specialty items that make the job much safer and easier.
| Item | Primary Function | Pro-Tip |
|---|---|---|
| Socket Wrench Set (10mm, 12mm, 13mm) | To loosen and tighten the nuts on the battery terminals and hold-down clamp. | A set with an extension bar can help reach awkwardly placed clamp bolts. |
| Alkali-Resistant Gloves | Protects hands from corrosive battery acid and grime. | Choose snug-fitting gloves to maintain dexterity when handling small nuts. |
| Safety Goggles | Shields eyes from accidental acid splashes or sparks. | Wear them throughout the entire process, from disconnection to final cleanup. |
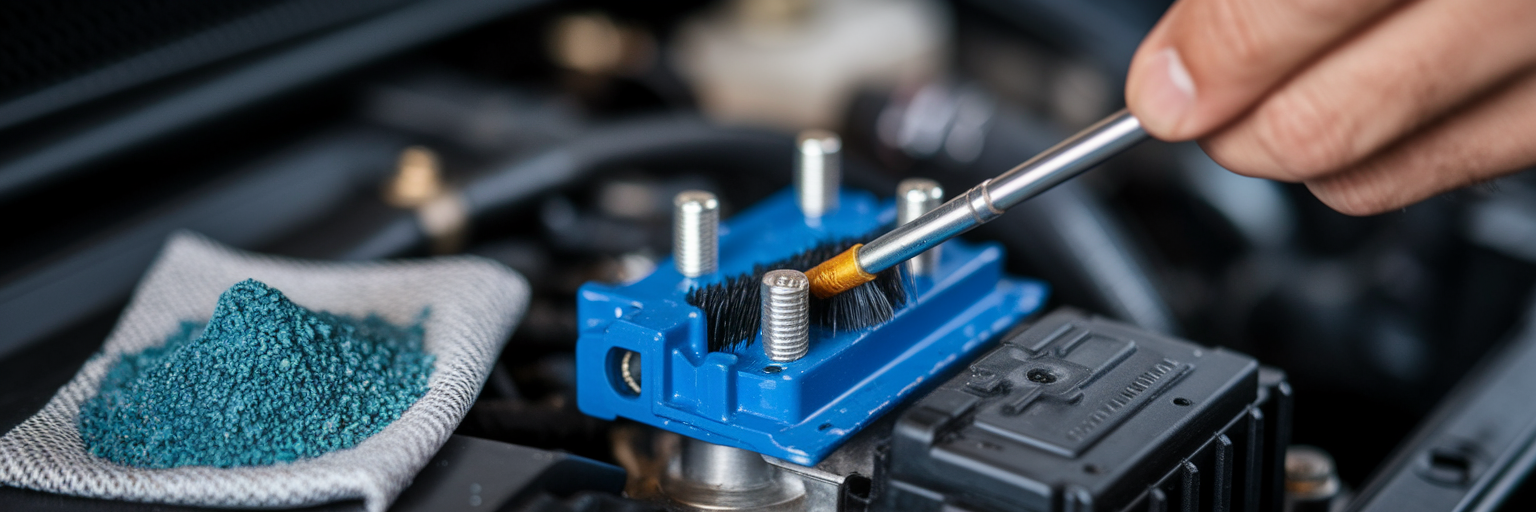
| Battery Terminal Brush | To scrub corrosion from battery posts and cable clamps. | The internal and external bristles are designed for posts and clamps, respectively. Use both. |
| Pliers | To grip and twist stubborn terminal clamps if they are stuck. | Adjustable pliers (channel locks) are versatile for various clamp sizes. |
Next, you need the correct battery. Your vehicle’s owner’s manual is the definitive source for this information. It will specify the required Group Size, which refers to the battery’s physical dimensions and terminal locations, ensuring it fits perfectly in the tray. It will also list the recommended Cold Cranking Amps (CCA). This rating measures the battery’s ability to start an engine in cold weather. A driver in North Dakota needs a higher CCA than someone in Florida. Whether you’re working on a classic like the first-generation Honda Accord or a brand-new model, the manual is your best friend. Finally, prepare your workspace. Park on a flat, level surface, engage the parking brake, and ensure you have plenty of light.
Step-by-Step Removal of the Old Battery
With your tools and new battery ready, it’s time to begin the removal. Following these car battery replacement steps in the correct order is essential for your safety and to protect your vehicle’s electrical system. We will break down the process into four clear actions.
Locating the Battery and Identifying Terminals
First, open the hood and locate the battery. It’s usually a black rectangular box with two connection points, or terminals. In most cars, it’s easily visible in the engine bay. However, some vehicles, including certain American trucks like the Ford F-150 or various European models, may house the battery in the trunk or under a rear seat. The terminals are marked with a plus (+) for positive and a minus (-) for negative. The positive terminal often has a red plastic cover.
Disconnecting the Negative Terminal First (The Critical Step)
This is the most important step for a safe removal. Always disconnect the negative terminal first. Use your socket wrench to loosen the nut on the negative (-) terminal clamp. You don’t need to remove the nut completely, just loosen it enough to wiggle the cable off the post. The reason for this rule is simple: the negative terminal is connected to the car’s metal frame, which acts as the “ground” for the entire electrical system. By disconnecting it first, you break the circuit. If your metal wrench accidentally touches a piece of the car’s frame while you’re working on the positive terminal later, nothing will happen. If you did it the other way around, that same slip could create a dangerous spark.
Disconnecting the Positive Terminal
Once the negative cable is disconnected and tucked safely away from the battery post, you can move on to the positive terminal. Flip open the red cover, if there is one, and use your wrench to loosen the nut on the positive (+) terminal clamp. Wiggle the cable free and move it aside.
Removing the Battery Hold-Down and Lifting
The battery is secured to its tray by a hold-down clamp or bracket. Use your wrench, possibly with an extension, to loosen and remove the bolts holding it in place. Now, you can lift the battery out. Be prepared: car batteries are surprisingly heavy, often weighing between 30 and 50 pounds. Bend at your knees, not your back, to lift it straight up and out of the tray. This simple technique will protect you from a potential back injury.
Installing the New Battery Correctly
Now that the old battery is out, you’re halfway there. Installing the new one is more than just reversing the removal steps. Taking a few extra moments to clean and connect everything properly ensures a solid connection and helps prevent future issues. The focus here is on how to connect car battery terminals for a reliable start every time.
Cleaning the Tray and Terminals
Before placing the new battery, look at the battery tray and cable clamps. If you see any fuzzy, white, or blue-green powder, that’s corrosion. It needs to be cleaned off to ensure a good electrical connection.
- Mix a tablespoon of baking soda with a cup of water to create a paste.
- Use your battery terminal brush to scrub the paste onto the cable clamps and the tray. You’ll see it fizz as it neutralizes the acid.
- Rinse the area carefully with a small amount of clean water and dry everything thoroughly with a rag.
A clean surface is the foundation for a long-lasting connection.
Positioning and Securing the New Battery
Carefully lower the new battery into the tray, making sure it’s oriented correctly with the positive and negative posts on the proper sides. Reinstall the hold-down clamp and tighten it until the battery is snug. It should not be able to slide or wobble at all. Excessive vibration is a hidden enemy of battery longevity, as it can damage the internal plates over time.
Connecting the Positive Terminal First
For installation, you reverse the disconnection order. Connect the positive (+) terminal first. Slide the positive cable clamp over the positive post and tighten the nut with your wrench until it’s secure. You shouldn’t be able to twist the clamp by hand. Connecting the positive side first is the safest method because the car’s ground circuit is still broken (since the negative cable is unattached), minimizing any risk of accidental sparks.
Connecting the Negative Terminal Last
Finally, connect the negative (-) cable to the negative post. As you slide the clamp on, you might see a tiny, harmless spark. This is normal; it’s just the electrical system being re-energized. Tighten the nut firmly. Give both cables a gentle tug to confirm they are secure. For a professional touch, apply a thin layer of dielectric grease to the terminals to protect them from moisture and prevent future corrosion.
Critical Safety Measures and Proper Disposal
To safely replace car battery components, you must respect the potential hazards involved. Car batteries contain corrosive sulfuric acid and can produce flammable hydrogen gas. Adhering to a few non-negotiable safety rules is paramount. Beyond the installation itself, responsible disposal is both an environmental and legal obligation.
Always keep these safety precautions in mind:
- Work in a well-ventilated area. Batteries can release hydrogen gas, which is highly flammable. Working outdoors or in an open garage prevents this gas from accumulating.
- The ‘No Sparks’ Rule. Absolutely no smoking, open flames, or activities that could create sparks near the battery. A single spark can ignite hydrogen gas.
- Handle Battery Acid with Care. If battery acid gets on your skin, flush it immediately with plenty of cool water. If it gets in your eyes, flush them for 15 minutes and seek immediate medical attention. Your safety goggles are your best defense.
Once the job is done, you are left with the old battery. It is illegal in the United States to throw a car battery in your household trash. They contain lead and acid, which are hazardous to the environment. The good news is that recycling them is easy and often financially beneficial. Most auto parts stores that sell batteries have a recycling program. They will take your old battery and may even give you a credit for it, known as a “core charge,” which you likely paid when you bought the new one. According to the U.S. Environmental Protection Agency, over 99% of lead-acid batteries are recycled, making them one of the most successfully recycled consumer products.
Tips to Extend the Life of Your New Battery

You’ve just invested in a new battery, so it makes sense to get the most out of it. With a few simple habits and periodic checks, you can significantly extend car battery life and avoid being stranded again. The alternator, which recharges the battery, and your driving habits play a huge role in its overall health.
Here are some actionable tips for long-term battery care:
- Avoid Frequent Short Trips. Starting your car draws a significant amount of power. Your alternator needs about 15 to 20 minutes of continuous driving to fully replenish that charge. Constant short trips of just a few minutes can slowly drain the battery over time.
- Keep Terminals Clean and Tight. The cleaning you did during installation isn’t a one-time task. Every few months, pop the hood and inspect the terminals for any signs of corrosion. A quick scrub with a wire brush can prevent power-sapping buildup.
- Minimize Parasitic Drain. This refers to the power your car draws even when it’s turned off. Common culprits include leaving interior lights on, or aftermarket accessories like dash cams and phone chargers that stay powered. Unplug devices when you leave the car.
- Ensure the Battery is Secure. Vibrations are a battery’s enemy. Periodically check that the hold-down clamp is still tight. A secure battery is a happy battery, as it prevents internal components from getting damaged on bumpy roads.
These small maintenance steps can make a big difference in performance and longevity. For more automotive news and in-depth car care guides, feel free to explore more of our resources at CarPhanatics.com.
Troubleshooting Post-Installation Issues
You’ve tightened the last bolt and closed the hood. It’s the moment of truth. For a first-timer, it can be nerve-wracking if something doesn’t work as expected. Fortunately, most post-installation problems are simple to fix and are often the result of a small oversight.
My Car Won’t Start or Just Clicks
This is the most common issue and almost always points to a connection problem. Before you panic, double-check that both terminal clamps are tight. Can you twist them by hand? If so, they’re too loose. Also, confirm you connected them correctly: positive (+) to positive, and negative (-) to negative. A reversed polarity can prevent starting and potentially damage electronics. If you’ve checked everything and are still stuck, our guide on why your car won’t start offers more detailed solutions.
My Radio/Clock Needs Resetting
This is completely normal. When you disconnected the old battery, you cut power to the car’s electronic memory. You will simply need to re-enter your favorite radio station presets and set the clock. It’s a minor inconvenience and a sign that you successfully reset the system.
Warning Lights Are On
On some modern vehicles, a battery change can trigger warning lights on the dashboard. This is often related to a feature called “battery registration.” Many newer cars, from European brands to high-tech American models like the upcoming 2026 Jeep Grand Cherokee, use a sophisticated power management system. The car’s computer needs to be told that a new battery has been installed so it can adjust its charging strategy. If unfamiliar lights stay on after a short drive, check your owner’s manual for a reset procedure or consult a professional mechanic who has the required scan tool.