Most drivers know the engine is the heart of their car, but few think about what it needs to breathe. The engine air filter is often called the “lungs” of the vehicle, and for good reason. Its primary job is to act as a gatekeeper, blocking a constant barrage of dust, pollen, and road grit from entering the sensitive internal components of your engine. This simple part is fundamental to a smooth-running vehicle and is a great starting point for anyone interested in DIY car maintenance.
The Role of the Engine Air Filter
Think of your engine as a high-performance athlete. For peak output, it needs a precise mixture of fuel and oxygen. A clean air filter ensures an unrestricted flow of clean air, allowing the engine’s computer to maintain this perfect air-to-fuel ratio for efficient combustion. When the filter gets clogged with dirt and debris, it’s like trying to run a marathon while breathing through a straw. The engine is starved of oxygen and has to work much harder to produce the same amount of power.
This strain isn’t just theoretical. You feel it directly from the driver’s seat. That hesitation when you press the gas pedal or the sluggish feeling when accelerating onto a highway often points back to a dirty filter. The engine compensates for the lack of air by burning more fuel, which means you’ll notice your gas mileage dropping. You’re essentially paying more at the pump for worse performance.
Beyond the hit to your wallet, a clogged filter also increases your vehicle’s emissions. An inefficient engine burns fuel incompletely, releasing more pollutants into the atmosphere. Regularly checking and changing your air filter is one of the simplest ways to improve car performance, save money on gas, and keep your engine healthy for the long haul.
Symptoms of a Failing Air Filter
While the mechanical effects of a clogged filter happen under the hood, the warnings it sends are often quite noticeable from the driver’s seat. Your car has its own way of telling you it’s struggling to breathe. Learning to recognize these signals can save you from poor performance and declining fuel economy. Paying attention to these signs of a bad air filter is key.
Here are the most common symptoms to watch for:
- Reduced Acceleration and Power: Does your car feel lazy or unresponsive? If pressing the accelerator results in more noise than speed, or if the engine seems to hesitate before picking up, it’s a classic sign of air starvation.
- Decreased Fuel Efficiency: One of the most tangible signs is making more frequent trips to the gas station. A clogged filter can disrupt the air-fuel balance, forcing the engine to consume more gasoline to compensate. If you find yourself filling up more often than usual, your air filter is a prime suspect.
- Check Engine Light: In more severe cases, the restricted airflow can confuse the Mass Air Flow (MAF) sensor, which measures the amount of air entering the engine. An incorrect reading can trigger a fault code and illuminate your check engine light. While a dirty filter is a common culprit, other issues can cause similar symptoms, like those we cover in our guide on why a car might be squeaking when you drive.
– Unusual Engine Sounds: When the engine is first started, you might hear it sputtering or idling roughly. At a standstill, the engine might vibrate more than usual. Some drivers even report a soft whistling sound during acceleration as the engine desperately tries to pull air through the blockage.
Inspection and Replacement Intervals
Knowing when to check your air filter can feel like a guessing game, but there are clear guidelines to follow. For most vehicles with standard disposable paper filters, the general rule of thumb is to inspect it every oil change and replace it every 12,000 to 15,000 miles. However, this is not a one-size-fits-all number.
Modern vehicles, especially those from manufacturers known for engineering longevity, may have longer service intervals. For instance, the owner’s manuals for many newer models from our brand-specific guides on Ford and other automakers often suggest replacement every 15,000 to 30,000 miles if you primarily drive in clean, paved environments. Your driving conditions are the most important factor. If you live in a dusty, rural part of the country like the Southwest or frequently travel on gravel roads, your filter will clog much faster. In these cases, you should check it every 3,000 to 5,000 miles.
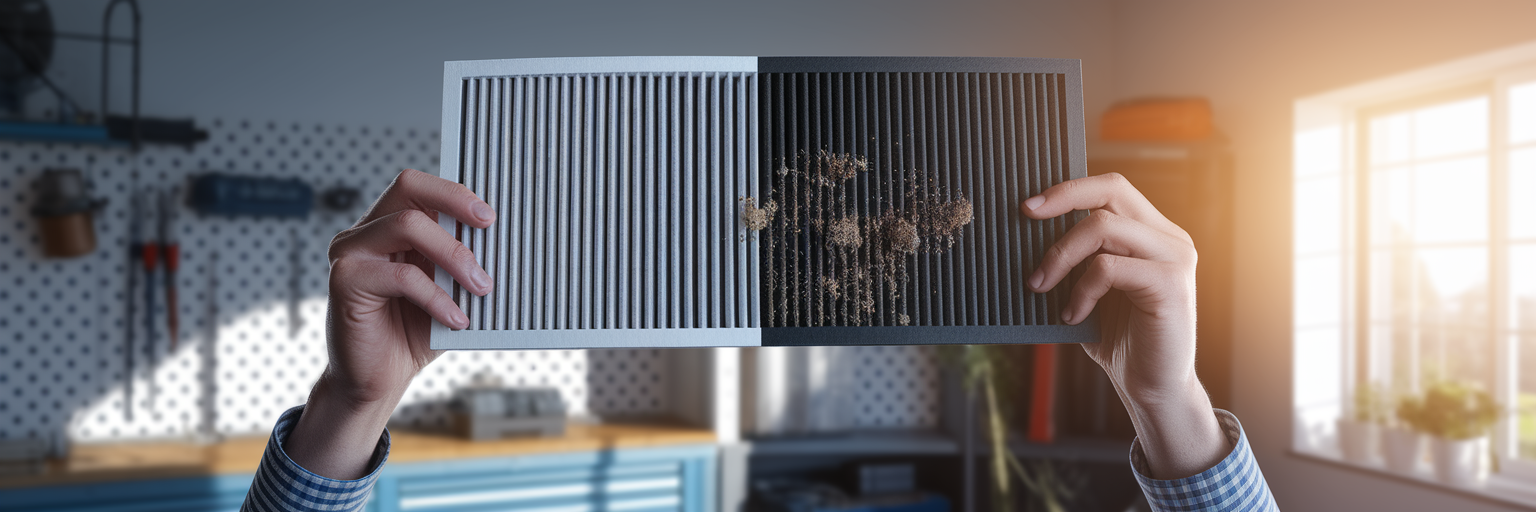
Forget the mileage for a moment. The most reliable test is a simple visual inspection. Remove the filter from its housing and hold it up to a bright light source. If you can’t see light passing through the paper pleats, it’s clogged with dirt and needs to be replaced, regardless of how many miles it has been in service. This quick check takes less than five minutes and is the most definitive way to know if your filter is still doing its job.
Choosing Between Disposable and Reusable Filters
When it’s time for a new filter, you’ll face a choice: stick with a traditional disposable one or upgrade to a reusable model? The right answer depends on your budget, how much hands-on maintenance you’re willing to do, and your long-term goals for the vehicle.
Standard Paper Filters (Disposable)
These are the factory-standard filters found in most cars. Their main advantage is a low upfront car air filter replacement cost, typically between $20 and $50. Replacement is quick and easy, requiring no special tools or cleaning. You simply swap the old one for a new one and you’re done.
Washable Filters (Reusable)
Made from materials like cotton gauze or foam, these filters are designed to last the lifetime of your vehicle. While the initial cost is higher, you save money over time by not having to buy replacements. They also reduce landfill waste, making them an environmentally conscious choice. However, they require periodic cleaning a reusable car air filter, which involves washing, drying, and re-oiling.
Performance Cold-Air Intake (CAI) Filters
For enthusiasts looking to maximize horsepower, a cold-air intake system is a popular modification. These systems relocate the air filter outside of the hot engine bay to draw in cooler, denser air, which can provide a modest performance boost. They almost always use a reusable filter and are a common upgrade on performance vehicles, including many of the powerful muscle cars we’ve reviewed.
| Factor | Disposable Paper Filters | Reusable (Cotton/Foam) Filters |
|---|---|---|
| Initial Cost | Low ($20 – $50) | High ($50 – $100+) |
| Long-Term Cost | Requires regular replacement | One-time purchase, plus cleaning kits |
| Maintenance Effort | Simple replacement (5-10 minutes) | Requires washing, drying, and re-oiling (several hours) |
| Environmental Impact | Contributes to landfill waste | Reduces waste, lasts the vehicle’s lifetime |
| Performance | Meets OEM specifications | May offer marginal airflow improvement |
A word of caution on reusable filters: the cleaning process must be done correctly. As a guide from Family Handyman highlights, a common mistake is over-oiling the filter after washing. Excess oil can get sucked into the intake and coat the delicate MAF sensor, leading to poor engine performance and potentially costly repairs that completely negate the long-term savings.
How to Change Car Air Filter: A Step-by-Step Guide
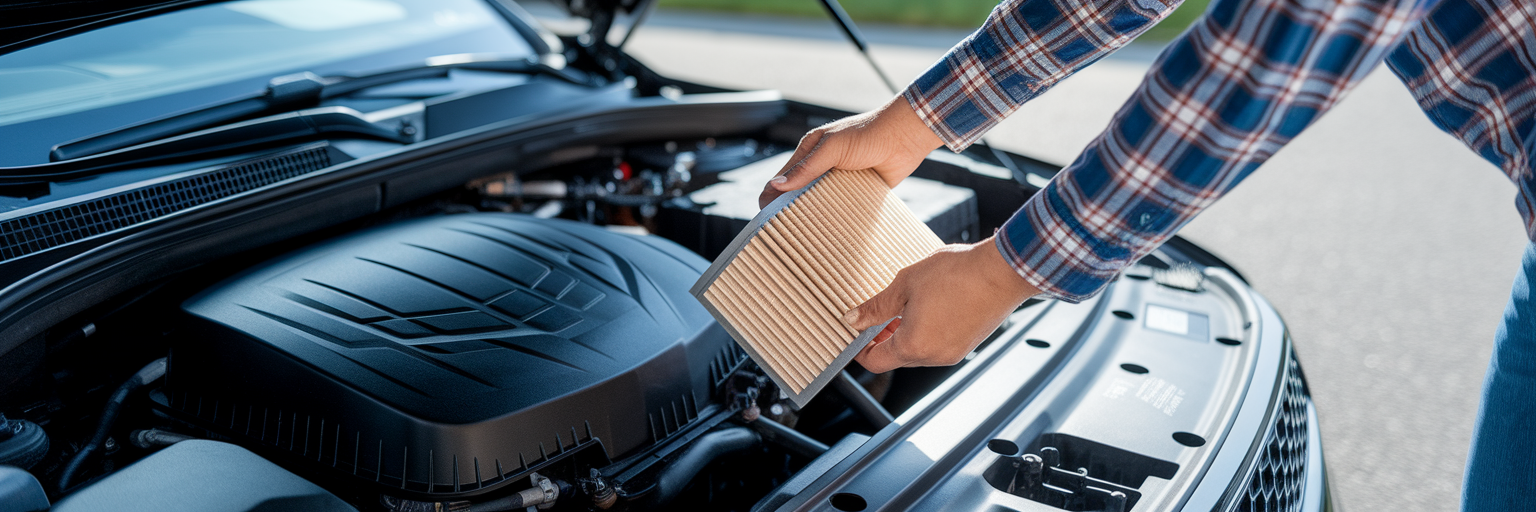
Changing a disposable air filter is one of the easiest and most rewarding DIY maintenance tasks you can perform. It requires minimal tools and usually takes less than 10 minutes. Following this simple guide on how to change car air filter will give you the confidence to get it done right.
- Preparation and Safety: Park your car on a level surface, turn off the engine, and let it cool down for a few minutes. Open the hood and secure it. You’ll likely only need a screwdriver or a socket wrench, if anything at all.
- Locate and Open the Air Filter Housing: Look for a large, black plastic box located near the top or side of the engine. It will have a large duct hose connected to it. The housing is typically secured with metal clips that you can undo by hand or a few screws.
- Remove the Old and Insert the New: Once the housing is open, lift out the old filter. Take a moment to notice which way it was installed. Before inserting the new one, use a rag or shop towel to wipe out any dust or debris from inside the housing. Then, place the new filter in, making sure it sits snugly and creates a proper seal.
- Secure the Housing and Verify: Close the housing cover and re-fasten the clips or screws. Ensure it’s securely sealed. To finish, start the engine and let it idle for a moment. It should run smoothly. That’s it, you’re done! This process is nearly identical across a wide range of vehicles, including many popular trucks and SUVs.
Properly Cleaning a Reusable Car Air Filter
If you’ve opted for a reusable filter, proper cleaning is essential to protect your engine and maintain performance. Rushing this process or using the wrong techniques can do more harm than good. Follow these steps carefully for a successful cleaning.
- Initial Debris Removal: After removing the filter from its housing, gently tap it on a hard surface to knock out any large, loose debris. We stand firm in our belief that you should never use compressed air to blow out the dirt. The high pressure can tear the delicate filter media, creating holes that will allow contaminants directly into your engine.
- Washing and Rinsing: Apply a specialized filter cleaning solution to both sides of the filter and let it soak for about 10 minutes. This will break down the grime and old oil. Then, rinse the filter with cool, low-pressure water from the inside out. This pushes the dirt away from the filter media instead of driving it deeper in.
- Drying and Oiling: This step requires patience. Gently shake out the excess water and let the filter air-dry completely. Do not use heat or compressed air to speed up the process. Once it is totally dry, apply a thin, even bead of filter-specific oil to the crown of each pleat. The oil will gradually wick into the cotton media.
- Critical Warning on Over-Oiling: Let the filter sit for about 20 minutes to allow the oil to spread. It is absolutely critical not to over-oil it. Excess oil will get pulled into the intake and contaminate the MAF sensor, which can cause rough idling, poor performance, and trigger the check engine light. A properly oiled filter should have a consistent color with no dripping oil.
Mastering these simple maintenance tasks not only saves you money but also connects you more deeply with your vehicle. For more expert guides and the latest automotive news, explore everything we have to offer at CarPhanatics.com.