The American tradition of working on your own car runs deep. It is about more than just saving a few dollars on labor. It is an act of self-reliance, a way to build a genuine connection with the machine that gets you through daily life. This hands-on approach is a core part of the car culture we live and breathe. But the line between a satisfying weekend project and a frustrating, expensive error is often thinner than we think. Small details can make all the difference.
This guide is for the enthusiast who wants to get the job done right. We are not here to judge. These are common missteps that even experienced DIYers can make. By understanding them, you can build confidence and ensure your efforts in DIY car repair safety lead to success, not setbacks. We will cover five key areas where things often go wrong: handling fasteners, choosing fluids, performing inspections, responding to warnings, and assessing your own skills. With the right knowledge, you can keep your vehicle reliable and your garage a place of accomplishment.
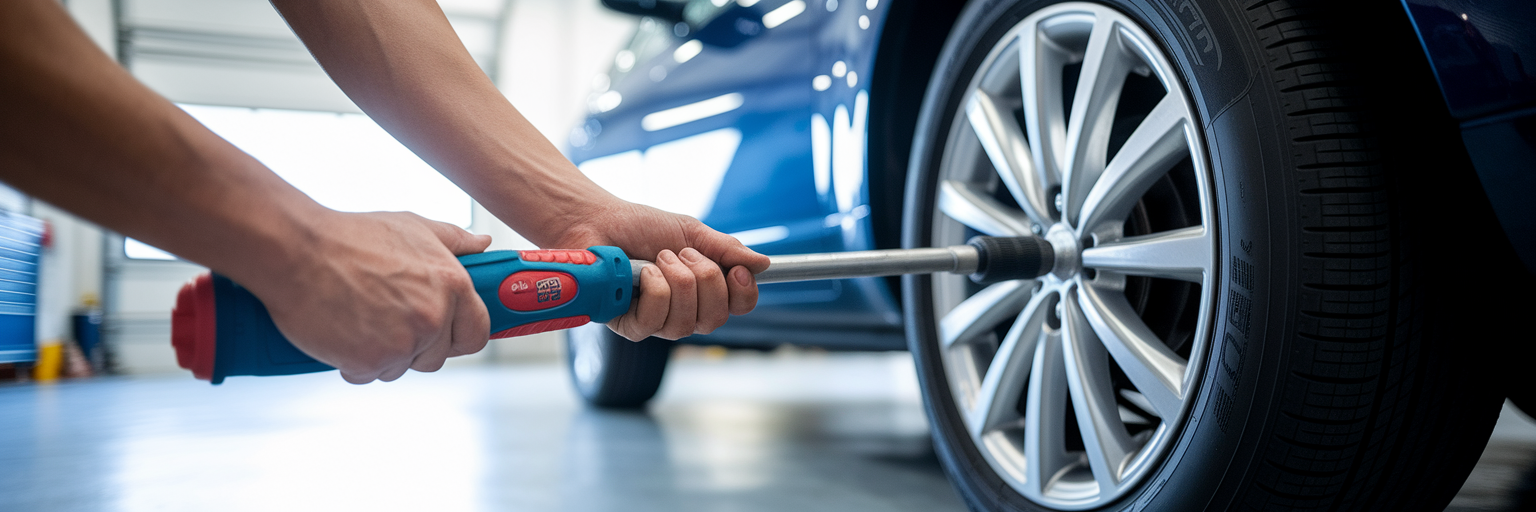
Mistake 1: Mishandling Bolts and Fasteners
When it comes to bolts and fasteners, many people think tighter is always better. This is a dangerous assumption. The truth follows the Goldilocks principle: they need to be just right. A perfect example is the act of tightening lug nuts on a wheel. The consequences of over tightening lug nuts are severe. You can stretch the wheel studs to the point of failure, warp your brake rotors leading to a pulsating pedal, or make it nearly impossible to change a flat tire on the side of the road.
On the other hand, under-tightened lug nuts are just as hazardous. They can cause a noticeable wheel wobble at speed and, in the worst-case scenario, allow the wheel to detach from the vehicle entirely. The solution is not guesswork. It is precision. A torque wrench is not a luxury for this job. It is a non-negotiable tool. Your vehicle’s owner’s manual contains the exact torque specifications, usually listed in foot-pounds (ft-lbs) or Newton-meters (Nm). Whether you are working on a family sedan or a powerful truck like the 2025 Ford F-150, using a torque wrench to achieve that specific tightness is critical for safety.
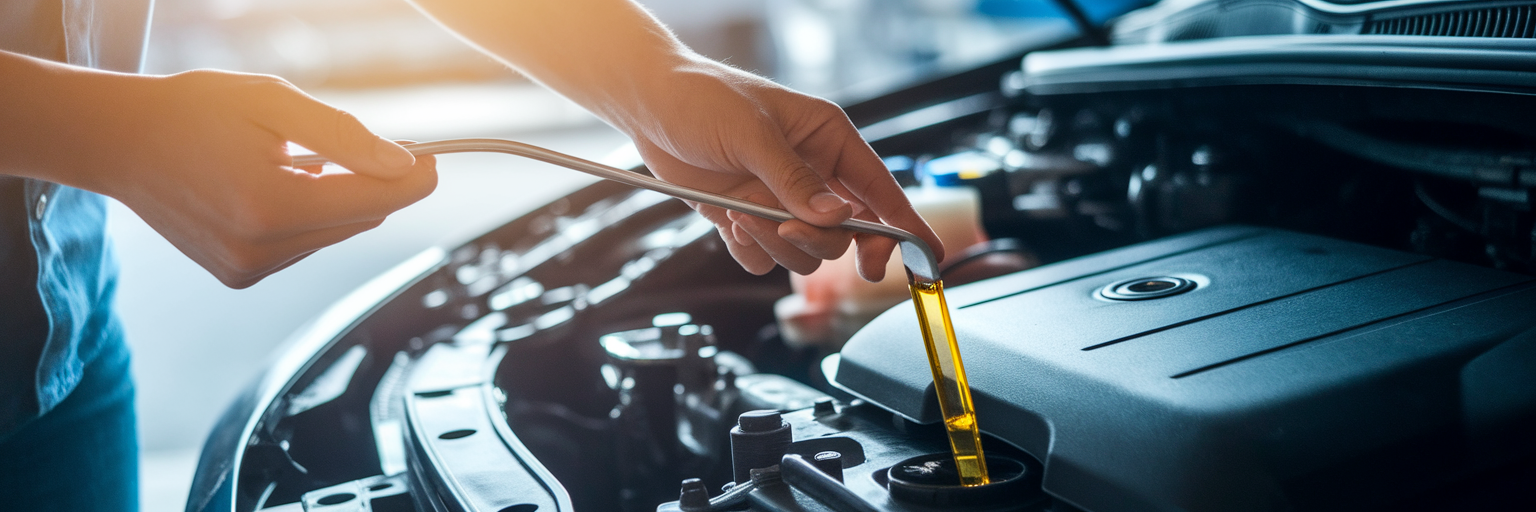
Mistake 2: Using Incorrect Fluids and Lubricants
Walking into an auto parts store can feel overwhelming. The shelves are lined with countless bottles of oils, coolants, and fluids, each promising superior performance. The critical mistake here is grabbing a product that seems “close enough.” Modern automotive fluids are not interchangeable. They are highly specialized formulas engineered for specific systems. A common error involves using wrong car fluids like engine oil. Pouring a 10W-30 oil into an engine designed for 5W-20 can harm fuel economy and accelerate wear, especially during cold starts.
This principle extends to every fluid in your vehicle. Different types of coolant, such as IAT, OAT, and HOAT, have different chemical makeups and should never be mixed. Doing so can cause corrosion and create a damaging sludge in your cooling system. The same goes for automatic transmission fluid (ATF). Using a generic “multi-vehicle” fluid in a transmission that requires a specific formula, like what is needed for many modern Honda models, can quickly lead to slipping gears and catastrophic failure. As highlighted by HowStuffWorks, these mistakes can cause serious and expensive mechanical problems. Even something as simple as using an ammonia-based glass cleaner can damage the delicate grid of a rear window defroster. Your owner’s manual is the ultimate authority. Always match its specifications to the label on the bottle before you pour.
| Fluid Type | Common Mistake | Potential Consequence | Correct Action |
|---|---|---|---|
| Engine Oil | Using wrong viscosity (e.g., 5W-30 instead of 5W-20) | Reduced fuel economy, increased engine wear, poor cold-start performance. | Match viscosity grade in owner’s manual exactly. |
| Coolant/Antifreeze | Mixing different types (e.g., OAT with HOAT) or using wrong color. | Corrosion of radiator and engine components, formation of damaging sludge. | Use the specific type and formulation (OAT, HOAT, IAT) required for your vehicle. |
| Transmission Fluid | Using a generic ‘multi-vehicle’ ATF in a system requiring a specific type (e.g., CVT fluid). | Slipping gears, overheating, and complete transmission failure. | Use only the exact ATF specified by the manufacturer (e.g., ATF+4, Mercon V, etc.). |
| Brake Fluid | Using DOT 3 in a system that requires DOT 4 or DOT 5. | Lower boiling point can lead to brake fade under heavy use; potential seal damage. | Use the DOT rating specified on the master cylinder cap or in the manual. |
This table illustrates how specific fluids are engineered for particular systems. The data is based on standard automotive engineering principles and manufacturer recommendations. Always consult your owner’s manual as the primary source of information.
Mistake 3: Neglecting Routine Fluid Level Inspections
While using the wrong fluid is a critical error, an equally damaging mistake is failing to check the fluid levels at all. This simple act of neglect can have devastating consequences, yet it is one of the easiest habits to build into your routine. Knowing how to avoid car repair mistakes often starts with these basic checks. Think of it as a quick health checkup for your vehicle. Low engine oil, for example, starves moving parts of lubrication, leading to increased friction, overheating, and potentially a seized engine. Neglecting this can leave you stranded and wondering why your car won’t start at all.
The process is straightforward and takes only a few minutes. Here is how to do it correctly:
- Park your car on a level surface to ensure an accurate reading.
- For engine oil, wait until the engine is cool. Pull the dipstick, wipe it clean, reinsert it fully, then pull it out again to read the level.
- Check coolant and brake fluid levels by visually inspecting the translucent reservoirs. The level should be between the ‘MIN’ and ‘MAX’ lines.
- If a fluid is low, top it off using the correct type as specified in your owner’s manual.
Make this a regular habit. Set a reminder to check your fluids once a month or every other time you fill up with gas. This small investment of time can save you from thousands of dollars in repairs down the road.
Mistake 4: Ignoring Dashboard Warning Lights
We have all felt it. That sinking feeling in your stomach when a little orange light shaped like an engine suddenly appears on your dashboard. The temptation to ignore it and hope it goes away is strong, but this is one of the most common DIY car maintenance mistakes. That “Check Engine” light is a direct message from your vehicle’s On-Board Diagnostics (OBD-II) system. It is your car’s way of telling you something is wrong.
The issue could be as minor as a loose gas cap, which is an easy fix. However, it could also signal a more serious problem like a failing oxygen sensor or a malfunctioning catalytic converter. Ignoring the light not only risks turning a small issue into a major repair but can also significantly decrease your fuel efficiency in the meantime. It is important to differentiate between a steady Check Engine light and more urgent warnings. A flashing Check Engine light or the illumination of the Oil Pressure or Brake System lights demands you pull over safely and shut off the engine immediately. Just as you would not ignore a strange sound and ask yourself why your car is squeaking when you drive, a dashboard light is a direct message that needs attention. As Toyota of Greenville highlights, ignoring these warnings is a top mistake car owners make. The good news is you can easily get an initial diagnosis. Most auto parts stores in the United States offer free OBD-II code scanning, giving you the information needed to make an informed decision.
Mistake 5: Attempting Repairs Beyond Your Skill Level
The drive to save money on a major repair is understandable. With countless online tutorials available, it can be tempting to tackle a complex job yourself. However, one of the most important skills a DIY mechanic can have is the ability to perform an honest self-assessment. Knowing your limits is not a sign of failure. It is a mark of a smart and safe vehicle owner. There is a clear difference between accessible maintenance and jobs best left to professionals with specialized tools and years of experience.
A good way to gauge this is to categorize the tasks:
- Beginner-Friendly Tasks: Changing engine oil and filter, replacing engine and cabin air filters, swapping a battery, replacing wiper blades.
- Intermediate Tasks: Replacing brake pads and rotors, changing spark plugs, replacing a thermostat.
- Advanced/Pro-Level Tasks: Timing belt or chain replacement, transmission service, suspension overhauls, internal engine work.
Attempting an advanced repair without the proper knowledge can have severe consequences. You could easily create a more complicated and expensive problem for a professional to fix later. More importantly, you could compromise the safety of your vehicle. Building your skills gradually is the right approach. Start with the basics and work your way up. Viewing a professional mechanic as a resource for complex jobs is a key part of responsible car ownership.
Fostering Smart and Safe DIY Habits
Successful DIY car maintenance is a blend of enthusiasm, the right tools, and sound judgment. It is about the satisfaction of a job well done and the confidence of knowing your vehicle is safe and reliable. By avoiding these common pitfalls, you can ensure your time in the garage is both productive and rewarding.
Remember these key takeaways:
- Always use a torque wrench for critical fasteners.
- Consult your owner’s manual to select the correct fluids.
- Check all fluid levels regularly as a preventative habit.
- Investigate dashboard warning lights promptly.
- Be honest about your skill level and know when to call a professional.
By embracing these smart habits, you can confidently enjoy the financial savings and personal satisfaction that come from maintaining your own car, keeping it ready for the road ahead.