
There are few things more refreshing than turning on your car’s air conditioning on a sweltering day. But that relief can quickly turn to disgust when the vents blast out a sour, pungent odor. If you’ve noticed your car AC smells like vinegar, you are not alone. This is a surprisingly common issue for drivers, especially in humid climates or during the transition from spring to summer. The good news is that this smell rarely signals a catastrophic mechanical failure. Instead, it points to a biological problem happening deep within your dashboard.
The distinctively sour smell is almost always caused by mold and bacteria that have taken up residence on your AC system’s evaporator coil. As these microorganisms metabolize, they produce organic acids, including acetic acid, the very same compound that gives vinegar its sharp aroma. The evaporator’s job is to get cold and pull humidity from the cabin air, much like a glass of iced tea “sweats” on a warm afternoon. This constant moisture, combined with the dark, enclosed space of the HVAC system, creates a perfect breeding ground for the microbes causing the odor. This article will explain the specific causes, discuss any health concerns, and provide step-by-step solutions for effective car ac mold removal so you can breathe easy again.
Why Your Car AC Smells Like Vinegar
That moment you turn on the air conditioning on a hot day, only to be met with a sour, vinegar-like odor, is an unpleasant but common experience for many drivers. This issue is particularly prevalent in humid climates or during the spring and summer months when AC use is high. The direct cause of this smell is almost always the growth of mold and bacteria on the AC system’s evaporator coil. These microorganisms produce acetic acid as a metabolic byproduct, which is the same acid responsible for vinegar’s distinct aroma. It is important to understand that this is not a sign of a major mechanical failure but rather a biological issue stemming from a damp environment inside your dashboard.
To understand why this happens, it helps to know the function of the evaporator coil. This component acts as the heart of the cooling process, getting extremely cold to pull heat and humidity out of the cabin air. Think of how a cold glass of iced tea collects condensation on its surface on a warm day. The evaporator’s fins do the exact same thing. This collected moisture is supposed to drain out of the vehicle, but some always remains. When this residual moisture combines with the dark enclosure of the HVAC system and trapped organic debris like dust and pollen, it creates the perfect breeding ground for the microbes that cause the car ac smells like vinegar problem. In the following sections, we will explore the specific components involved, detail the DIY solutions, and outline prevention strategies to keep your car’s air fresh.
Understanding Your Car’s HVAC System Components
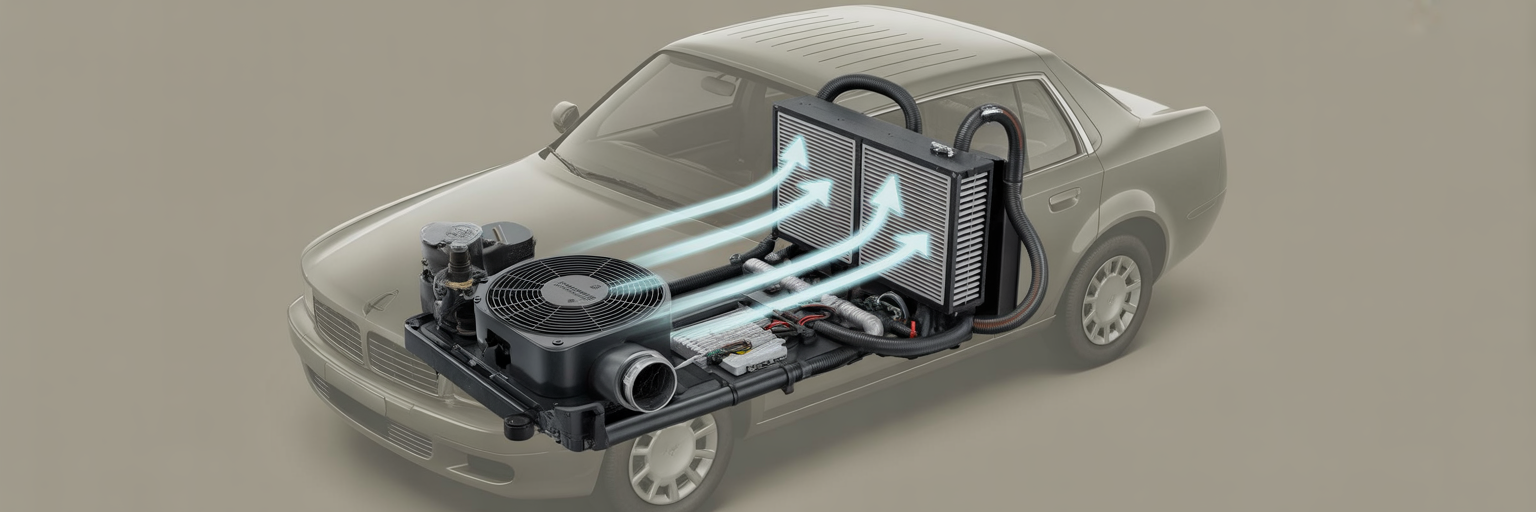
To effectively tackle that sour smell, it helps to have a basic understanding of your car’s Heating, Ventilation, and Air Conditioning (HVAC) system. Knowing how these parts work together is crucial for diagnosing why the odor occurs and how to fix it permanently. The system is more than just a button on your dash; it’s a network of components designed to control your cabin’s climate. Keeping all parts of a vehicle in good working order is key to its longevity, which helps explain why some high-mileage cars age better than others due to consistent care.
The Evaporator Coil: The Source of the Chill
Hidden deep within the dashboard, the evaporator coil is a small, radiator-like unit that is the primary site of the odor problem. As refrigerant flows through it, the evaporator becomes intensely cold. The blower motor pushes warm cabin air across its fins, and the evaporator absorbs the heat from that air. This process is what cools your car, but it has a significant side effect: it causes moisture in the air to condense into water on the fins. This is where the mold and bacteria find the dampness they need to thrive.
The Cabin Air Filter: The First Line of Defense
Your cabin air filter is the gatekeeper for the air entering your HVAC system. Its job is to trap dust, pollen, leaves, and other airborne debris from the outside before they can reach the evaporator. However, when this filter becomes dirty and clogged, it can no longer do its job effectively. A clogged filter restricts airflow, which can cause the evaporator to get too cold and produce even more condensation. Worse, a damp and dirty filter can become a source of mold growth itself, contributing directly to the musty smell from car vents.
The AC Drain Line: The Exit Route for Moisture
This simple but critical component is a small rubber tube that runs from the evaporator housing through the vehicle’s floor or firewall. Its sole purpose is to allow the condensation collected by the evaporator to drip harmlessly onto the ground underneath your car. A clog in this drain line, often caused by debris or insect nests, is a primary culprit behind severe odor issues. If the water cannot escape, it backs up and stagnates in the evaporator case, creating a swampy environment where mold and bacteria can grow uncontrollably.
Other parts like the compressor (the system’s pump), the condenser (the radiator at the front of the car that releases heat), and the blower motor (the fan) all work in concert, but the evaporator, cabin air filter, and drain line are the key players in the battle against AC odors.
The Science Behind the Sour Smell: Bacteria and Mold
While it’s easy to say the vinegar smell comes from mold, it’s useful to understand the specific science behind why it forms in your car. The growth of these microorganisms isn’t random; it requires a precise recipe of conditions that are unfortunately common inside a vehicle’s HVAC system. The three essential ingredients are moisture, darkness, and a food source. The moisture comes from the condensation that naturally forms on the cold evaporator coil every time you run the air conditioning.
The darkness is provided by the enclosed evaporator housing, which is tucked away from sunlight deep inside the dashboard. The final ingredient, a food source, is a biofilm that builds up on the evaporator fins over time. This sticky layer is composed of organic matter like dust, pollen, dead skin cells, and other microscopic debris that manages to get past the cabin air filter. This biofilm provides the perfect nutrient base for bacteria and mold to colonize and multiply.
The condensation process is central to the problem. When your AC is running, the surface of the evaporator can drop to temperatures near freezing. This causes water vapor in the warm cabin air to rapidly condense into liquid water. This water is supposed to be constantly removed by the AC drain line. However, some residual moisture always clings to the fins and the housing even after the AC is turned off. The situation becomes dramatically worse when the drain line gets clogged. If water cannot escape, it pools in the bottom of the evaporator case. This transforms the housing into a stagnant, swamp-like environment that guarantees the rapid growth of microbial colonies. This is what leads to a powerful and persistent musty smell from car vents, which often intensifies into that sharp, vinegar-like odor as the bacteria produce acetic acid.
Health Concerns and Differentiating Dangerous Odors

When you notice an unpleasant smell in your car, a natural first question is, “Is this harmful to breathe?” For most healthy individuals, the vinegar odor itself is more of an annoyance than a direct health threat. However, it signifies poor air quality, as the smell is a byproduct of mold spores and bacteria being blown directly into the cabin. The real concern lies with the inhalation of these microorganisms, especially for sensitive groups. Children, the elderly, and individuals with asthma, allergies, or compromised immune systems are more susceptible to adverse effects. Symptoms can include eye, nose, and throat irritation, coughing, sneezing, and the triggering of allergic reactions or asthma attacks. As the U.S. Environmental Protection Agency (EPA) confirms, exposure to damp and moldy environments can cause a variety of health effects in sensitive people.
To provide real value, it is critical to differentiate the sour smell from other, more dangerous odors that can signal serious mechanical issues. The following guide can help you quickly diagnose what your car is trying to tell you.
| Odor | Likely Cause | Danger Level | Recommended Action |
|---|---|---|---|
| Sour / Vinegar / Musty | Mold and bacteria in the AC evaporator | Low (Irritant) | Clean HVAC system and replace cabin air filter. |
| Sweet / Syrupy | Coolant (antifreeze) leak from the heater core | High (Toxic) | Stop driving. Have the vehicle professionally inspected immediately. |
| Burning Rubber | Slipping accessory belt or hose rubbing on a pulley | Moderate to High | Pull over safely and inspect. May require immediate service. |
| Burning Plastic / Electrical | Electrical short or melting component | High (Fire Risk) | Pull over immediately, turn off the engine, and call for service. |
| Gasoline | Fuel leak from a line, injector, or the tank | High (Fire Risk) | Do not start the engine. Have the vehicle towed for repair. |
This table helps drivers quickly distinguish between the relatively harmless vinegar smell and other odors that signal dangerous problems requiring immediate attention. A sweet smell, in particular, indicates a toxic coolant leak and should never be ignored.
A Practical Checklist for Diagnosing the Odor
Before you start buying cleaning products or attempting repairs, it’s wise to perform a few simple checks to confirm the source of the smell. This practical checklist empowers you to diagnose the issue with confidence. Understanding these simple diagnostic steps is a valuable skill for any car owner, especially those looking for the best used cars for first-time buyers under $12,000, where keeping a close eye on maintenance is essential.
- Confirm the Source: Start your car and run only the fan without the AC button pressed. Sniff the air coming from the vents. Now, turn the AC on. If the sour smell appears or becomes significantly stronger only when the AC compressor is engaged, you have successfully confirmed the problem originates within the AC system itself.
- Check the Drain Line: This is a crucial diagnostic step. On a dry day, park your car on a flat, dry surface like a concrete driveway. Run the air conditioning on its highest setting for about 10 to 15 minutes. Afterward, look underneath the car, typically on the passenger side near the firewall. You should see a small puddle of clean water dripping. Seeing this puddle is a good sign that your drain line is open. The absence of a puddle is a strong indicator that the line is clogged.
- Look for Interior Leaks: A severely clogged drain line has a very telling secondary symptom. Carefully feel the carpet on the passenger-side floor, especially up under the dashboard near the center console. If the carpet feels damp, soggy, or is visibly wet, this is definitive proof that the backed-up condensation is overflowing from the evaporator case and leaking into your cabin.
- Inspect the Cabin Air Filter: Even if it’s not the sole cause, a dirty filter is always a contributor. While the exact location varies, you can often perform a preliminary check. A filter that is visibly filthy, discolored, or feels damp is a clear sign that it needs to be replaced and is part of the overall odor problem.
DIY Fix 1: How to Replace Your Cabin Air Filter

The first, easiest, and most important step in any car ac mold removal effort is to replace the cabin air filter. A clean filter is non-negotiable for achieving fresh air in your vehicle. Even if it doesn’t solve the entire problem on its own, a dirty filter will undermine any other cleaning efforts, so this task must be done. The process is straightforward for most vehicles and requires only basic tools, if any.
Here is a general step-by-step guide:
- Locate the Filter: In the vast majority of modern cars, the cabin air filter is located behind the glove box. You will need to empty the glove box completely to get started.
- Access the Housing: Look for support struts or stoppers on the sides of the glove box that prevent it from opening too far. These usually detach with a simple unhooking motion. Once they are free, you can gently squeeze the sides of the glove box inward, allowing it to swing down completely and hang out of the way. This will reveal the HVAC housing behind it.
- Replace the Filter: You should now see a rectangular cover, which is the access door for the filter. It is typically held in place by a few clips or screws. Once you remove the cover, you can see the edge of the old filter. Before you pull it out, pay close attention to an “AIR FLOW” arrow printed on its side. This indicates the correct orientation for installation.
- Install the New Filter: After removing the old filter, it’s a good idea to use a vacuum with a hose attachment or a damp cloth to clean out any leaves, dirt, or other debris from the filter housing. Then, slide the new filter into the slot, making sure the airflow arrow on the new filter points in the same direction as the old one. Re-secure the access cover, reattach the glove box, and you’re done.
When selecting a replacement, consider upgrading to a cabin air filter that includes a layer of activated charcoal. Standard filters trap particulates like dust and pollen, but activated charcoal is excellent at adsorbing odors and chemical pollutants from the air. This provides an extra layer of defense against the vinegar smell and other outside odors, making it a worthwhile investment for better air quality.
DIY Fix 2: Using an AC Disinfectant Treatment
If replacing the cabin air filter didn’t completely eliminate the odor, the next logical step is a direct attack on the mold and bacteria. This involves using a specialized AC disinfectant product designed for car evaporator coil cleaning. These treatments are formulated to kill the microorganisms at their source without harming the delicate components of your HVAC system. There are two main types of products available to consumers.
Aerosol Sprays: The ‘Through-the-Vents’ Method
This is often the simpler of the two methods. These aerosol products are designed to be circulated through the entire HVAC system. The process typically involves setting your AC to its highest fan speed on the fresh air (not recirculation) setting. You then spray the disinfectant into the exterior air intake vents, which are usually located at the base of the windshield. The system’s fan pulls the antimicrobial mist through the ductwork, where it coats the evaporator coil and other internal surfaces, killing the odor-causing microbes. This method is good for a general system flush.
Foaming Cleaners: The Direct-to-Coil Approach
For a more targeted and potent treatment, a foaming cleaner is the better choice. This method is more direct and often more effective for stubborn odors. These products come with a long, thin application tube that allows you to apply the cleaner as close to the source as possible. The tube is typically inserted either up through the AC drain line from underneath the car or through a small, designated access point in the evaporator case. Once sprayed, the foam expands to completely cover the evaporator fins. It disinfects as it sits, breaking down the biofilm, and then liquefies and drains out through the AC drain line, carrying the grime with it. This is a very effective way to handle the question of how to fix car ac smell.
A critical warning is necessary here: never use general-purpose household cleaners like Lysol, bleach, or other disinfectants in your car’s AC system. These products contain harsh chemicals that can corrode the delicate aluminum fins of the evaporator coil. This corrosion can lead to refrigerant leaks and very expensive repairs. Always use a product specifically labeled for automotive HVAC systems. Finally, perform this treatment in a well-ventilated outdoor area, wear gloves and safety glasses, and follow the product’s instructions precisely, especially regarding the time needed to air out the vehicle before driving.
When to Call a Professional: Advanced Cleaning and Repair

While DIY solutions are effective for most mild to moderate odor problems, there are times when calling a professional is the best course of action. If you have tried replacing the filter and using a disinfectant treatment but the smell persists or returns very quickly, it likely indicates a more severe contamination or a stubborn clog that requires specialized tools.
A professional mechanic has access to equipment that goes beyond what is available to the average car owner. They can use a borescope, which is a small camera on a flexible tube, to visually inspect the evaporator coil for heavy biofilm buildup without having to disassemble the entire dashboard. For cleaning, they may employ high-pressure steam cleaners or ultrasonic systems that can thoroughly remove the stubborn contamination from the evaporator fins. These methods are far more comprehensive than DIY sprays or foams.
The most common professional repair for this issue is clearing a severely clogged AC drain line. While a minor clog can sometimes be cleared from below with a piece of flexible wire, a heavily impacted clog might require compressed air or specialized tools to safely dislodge the blockage without damaging the tube or the evaporator housing. Attempting this without the right equipment can sometimes make the problem worse. The cost for a professional cleaning service can range from around $100 to over $300, depending on the method used and your vehicle. While it’s an expense, it is often the most definitive solution for a persistent odor and a smart investment in your car’s air quality. This is a consideration for all car owners, including those who own one of the best used luxury SUVs that won’t destroy you on repairs, where balancing comfort with necessary maintenance is key.
The Best Prevention: Mastering the AC Dry-Out Method
After you have successfully eliminated the vinegar smell, the last thing you want is for it to return. The single most effective, no-cost preventative measure you can take is to adopt a simple habit known as the “AC dry-out method.” This technique takes less than a minute at the end of each drive but pays huge dividends in maintaining fresh air quality and stopping mold growth before it can even begin.
The process is incredibly simple. Just follow these steps every time you use your air conditioning:
- Two to five minutes before you reach your destination, turn the ‘A/C’ button off. This action disengages the compressor, which means the system stops actively cooling the air.
- Leave the fan running. Keep the blower motor on, pushing air through the vents as you complete your drive.
The science behind this technique is straightforward and effective. By turning off the compressor but leaving the fan on, you allow ambient-temperature air to blow across the cold, wet evaporator coil. This continuous airflow quickly evaporates the residual condensation that would otherwise cling to the fins after you park. When you turn off the car, the evaporator and the entire HVAC housing are left dry. A dry evaporator denies mold and bacteria the moisture they need to survive and grow, effectively preventing the problem at its source.
For maximum effectiveness, especially in very humid climates, you can add a pro-tip to this routine. For the last minute of the dry-out process, turn the temperature dial to full heat. The warm air will dramatically accelerate the evaporation process, ensuring the system is left bone-dry. Making this a regular habit is the ultimate key to long-term freedom from AC odors.
Long-Term Habits for a Fresh-Smelling AC System

Building on the AC dry-out method, incorporating a few other long-term habits into your vehicle maintenance routine will provide a holistic defense against odors. These simple, consistent actions ensure your HVAC system remains clean and dry, preventing the conditions that allow mold and bacteria to flourish. Think of these as part of the overall wellness plan for your car. These small steps, much like regular fluid checks, are part of how to keep your car’s engine running for years and ensure the entire vehicle remains in great condition.
- Change the Cabin Air Filter Regularly: Adhere to your vehicle manufacturer’s recommended replacement interval, which is typically every 12,000 to 15,000 miles. If you live in a particularly dusty, polluted, or high-pollen area, consider changing it more frequently, such as once a year.
- Use Fresh Air Mode: It can be tempting to leave the AC on the ‘Recirculation’ or ‘Max AC’ setting for rapid cooling, but this mode traps moisture and contaminants inside the cabin. Make it a habit to use the ‘Fresh Air’ setting whenever practical to promote ventilation and flush out stale, humid air from the system.
- Keep the Cowl Clean: Periodically check and clean the area at the base of your windshield where the exterior air intake vents are located. Regularly clearing away leaves, pine needles, and other organic debris prevents it from being sucked into the HVAC system, where it can clog the drain or decompose and become food for mold.
- Run the Fan Periodically: Even during seasons when you are not using the AC, like in the winter, it is a good practice to run the fan for a few minutes every week or so. This circulates air through the system and helps prevent moisture from stagnating during long periods of disuse.