Modern vehicles are more complex than ever, but the principles of their electrical systems remain surprisingly consistent. When something goes wrong, it can feel intimidating, but many common car electrical problems are entirely manageable for a home mechanic. This guide will walk you through the process of identifying symptoms, working safely, and performing a confident DIY car electrical diagnosis.
Recognizing the Telltale Signs of Electrical Trouble
Before you even open the hood, your car is giving you clues. Those frustrating little glitches are not random failures; they are symptoms pointing you toward the source of the problem. The first step is learning to interpret what your vehicle is trying to tell you. The most obvious signs are visual. Do your headlights dim when you are idling at a stoplight, then brighten as you accelerate? Do your interior dome lights look weak and yellow instead of bright white? These are classic indicators of a struggling charging system or a weak battery.
Pay attention to the dashboard. Warning lights that flicker without reason or a whole cluster that goes dark momentarily often point to a poor ground connection or a fault in the ignition system. These are the electrical gremlins that can drive you mad, but they are almost always rooted in a physical cause.
Auditory clues are just as important. We all know the sound of a healthy engine turning over. Contrast that with the slow, labored “rur-rur-rur” of an engine struggling to crank. That sound often signals a battery that lacks the power to do its job. An even more distinct sound is the sharp, single “click” you hear when turning the key, which points directly to a problem with the starter motor, its solenoid, or a very weak battery.
If you find yourself replacing the same fuse repeatedly, stop. A fuse is a safety device designed to be the weak link in a circuit. Its job is to fail before a more expensive component is damaged. A fuse that keeps blowing is a definitive sign of a short circuit or an overloaded component that needs to be found and fixed.
Finally, trust your nose. The smell of burning plastic or melting wire insulation is the most urgent warning your car can give you. This is a non-negotiable, pull-over-immediately situation. It indicates a severe short circuit that is generating enough heat to become a fire hazard. Ignoring this smell is not an option.
Essential Safety Protocols for Electrical Work

Before you pick up a single tool, we need to talk about safety. A car’s electrical system is low voltage, but it is not without its dangers. Approaching it with respect and a clear plan is the mark of a smart mechanic, not a timid one. Your personal safety is more important than any repair.
The single most important rule is to disconnect the battery before working on any electrical component. The procedure is simple but critical: always disconnect the negative (-) terminal first. When you are finished, reconnect the negative terminal last. This order prevents you from accidentally creating a short circuit if your wrench touches a metal part of the car while you are working on the positive terminal. It is a small step that prevents big problems.
Your next priority is personal protective equipment (PPE). It is not overkill; it is essential.
- Safety Glasses: Your eyes are irreplaceable. A sudden spark or an unexpected splash of corrosive battery acid can cause permanent damage. Wear them every time.
- Insulated Gloves: While not always necessary for low-voltage checks, they provide an extra layer of protection against shock and are a good habit to build.
Understand the specific hazards you are dealing with. Car batteries contain sulfuric acid, which can cause severe chemical burns. The hydrogen gas they can vent is also flammable, meaning a single spark in the wrong place could ignite it. Always work in a well-ventilated area and keep any sources of ignition far from the battery. If your engine must be running for a test, be acutely aware of moving parts like the serpentine belt and cooling fan. Tie back long hair and avoid loose clothing that could get caught.
We strongly recommend keeping a Class C rated fire extinguisher within arm’s reach. This specific type is designed for electrical fires and is a crucial piece of safety gear for any garage. Finally, prepare your workspace. Ensure it is dry and well-lit. Remove any flammable liquids from the immediate area. And most importantly, take off any metal jewelry. A ring, watch, or necklace can conduct electricity if it accidentally bridges a circuit, causing a severe burn.
Assembling Your DIY Electrical Diagnostic Toolkit
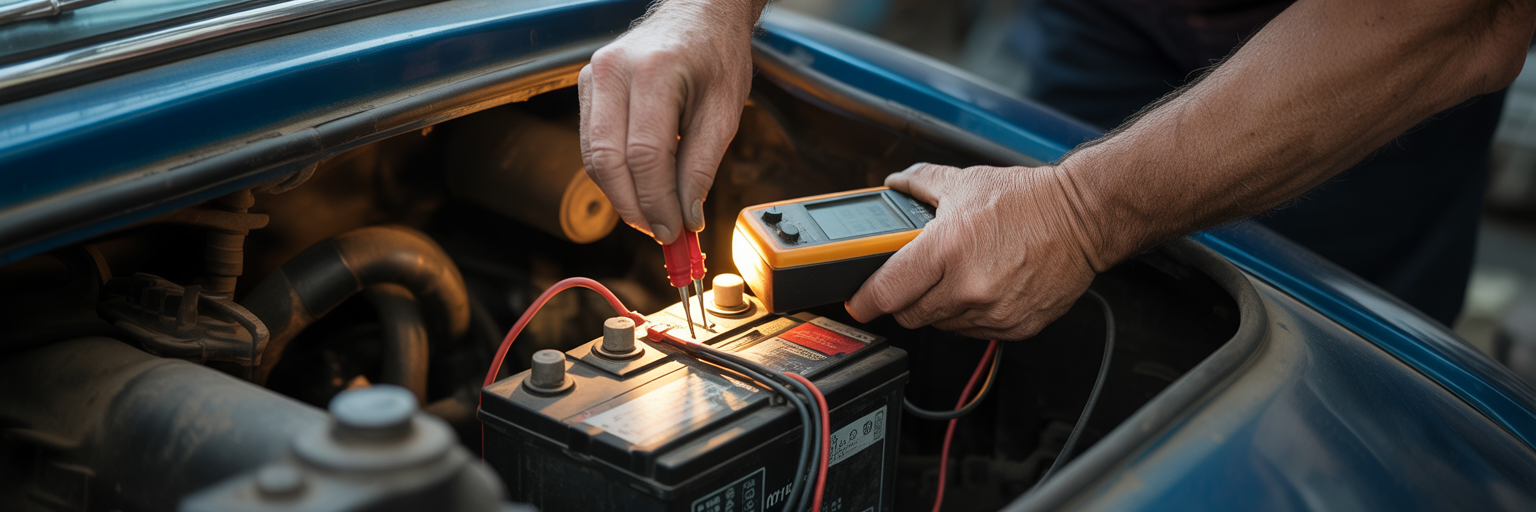
You do not need a professional-grade workshop to tackle most electrical issues, but having the right tools makes the job infinitely easier and more accurate. This is not about just having tools; it is about understanding what each one does and when to use it. The cornerstone of any DIY car electrical diagnosis toolkit is the Digital Multimeter (DMM). This device is your window into the electrical system, allowing you to measure three key things: DC voltage to check battery and alternator health, resistance (ohms) to test sensors, and continuity to find broken wires.
A simpler, and often faster, tool for some jobs is a 12V test light. Think of it as a go/no-go gauge. It will not give you a precise voltage reading, but it is perfect for quickly confirming if power is present at a fuse or a connector. It lights up if there is power, and stays dark if there is not. Both tools are essential, but they excel at different tasks.
| Diagnostic Task | Digital Multimeter (DMM) | Test Light |
|---|---|---|
| Checking Battery Health | Ideal (Provides exact voltage, e.g., 12.6V) | Not Recommended (Only shows power is present) |
| Testing Alternator Output | Ideal (Shows precise charging voltage, e.g., 14.2V) | Not Recommended (Cannot measure charging level) |
| Verifying Power at a Fuse | Good (Shows voltage) | Excellent (Quickly confirms power presence) |
| Finding a Broken Wire (Continuity) | Ideal (Beeps to confirm a complete circuit) | Not Usable for this test |
| Measuring Resistance (Sensors) | Ideal (Provides specific Ohm readings) | Not Usable for this test |
Beyond these diagnostic tools, you will need a few essential hand tools and supplies:
- Wire Strippers: A quality pair with marked gauges is crucial. Using the right size removes insulation cleanly without nicking the copper wire beneath, which would weaken the connection.
- Wire Crimpers: These are for creating strong, secure mechanical bonds with terminals and butt connectors. This is the professional way to join wires.
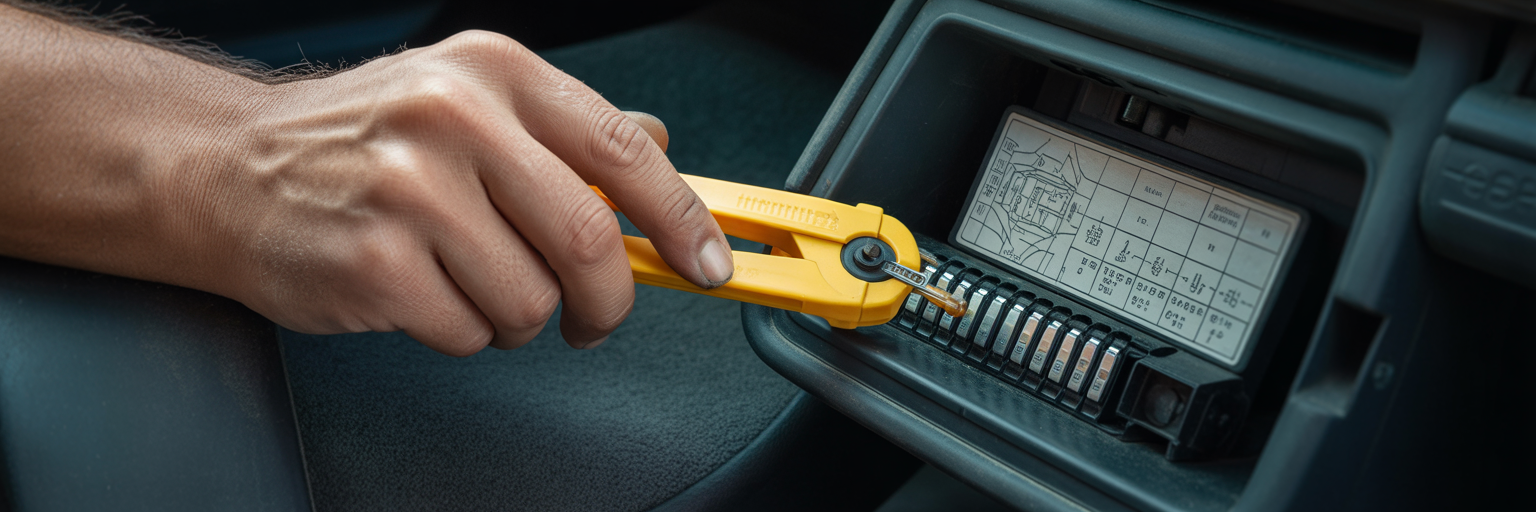
- Fuse Puller: A small, inexpensive plastic tool that makes removing tiny blade fuses from a crowded fuse box simple and safe.
- Repair Supplies: Stock your toolbox with an assortment of automotive blade fuses, quality electrical tape, various sizes of heat shrink tubing for weatherproofing, and zip ties for securing your finished repair.
For those looking to tackle more modern vehicles, consider a set of backprobe pins. These thin, sharp probes allow you to test for voltage at sealed weather-pack connectors without piercing the wire’s insulation, preventing future corrosion and damage at the test point.
Your First Steps in Electrical Diagnosis
Before reaching for a multimeter, start with the basics. Many car electrical problems can be identified and sometimes even solved with a careful visual and physical inspection. Your eyes and hands are your first and most important diagnostic tools. Begin with a thorough look around the engine bay and battery area. Look for the obvious signs of trouble: a thick, crusty layer of white or blue-green powder on the battery terminals is corrosion that chokes off electrical flow. Check for frayed wires or insulation that looks like it has been chewed on, a surprisingly common issue caused by rodents seeking shelter.
Next, locate the main ground straps. These are thick braided cables that connect the battery to the car’s chassis and the engine block to the chassis. A loose or corroded ground is one of the most common causes of bizarre, intermittent electrical issues. Give them a gentle tug to ensure they are secure.
If a specific component has stopped working, the next logical step is learning how to test a car fuse. Modern cars often have two or more fuse boxes, typically one under the hood and another inside the cabin (often under the dashboard or in the kick panel). The cover of the fuse box or your owner’s manual will have a diagram identifying which fuse protects which circuit. Using a fuse puller, remove the correct fuse and hold it up to the light. You should see a thin metal strip connecting the two blades. If that strip is broken or looks melted, the fuse has done its job and blown.
Remember, a blown fuse is a symptom, not the cause. If you replace it and the new fuse blows immediately, you have confirmed there is a short circuit in that system that needs to be found.
For those frustrating intermittent faults, the “wiggle test” is an invaluable technique. With the circuit active (for example, ignition on and the faulty accessory switched on), gently wiggle the wiring harness and connectors associated with that component. If the accessory flickers or suddenly starts working as you move a specific section of wire, you have just pinpointed the location of the loose connection or internally broken wire. This kind of physical degradation is a major reason why some high-mileage cars age better than others; wiring integrity is key.
Using a Multimeter for Deeper Diagnostics
When visual checks are not enough, the digital multimeter becomes your most powerful ally. It allows you to quantify the health of your electrical system with precise measurements. These tests are straightforward and provide definitive answers about where the problem lies.
Performing a Static Battery Voltage Test
This is the fundamental car battery voltage test. With the vehicle turned completely off, set your multimeter to the 20V DC setting. Touch the red probe to the positive (+) battery terminal and the black probe to the negative (-) terminal. A healthy, fully charged battery should read approximately 12.6 volts or slightly higher. A reading around 12.4V means it is about 75% charged, while anything below 12.2V indicates a discharged battery that either needs charging or may be failing.
Testing the Alternator’s Output
To check if your battery is being properly recharged, start the car and let it idle. Perform the same voltage test across the battery terminals. With the engine running, a healthy charging system should produce a reading between 13.7 and 14.7 volts. If the reading is below 13.5V, your alternator is likely not producing enough charge. If it is above 15V, the voltage regulator is probably faulty and is overcharging the battery, which can cause damage.
Checking for Continuity
A continuity test tells you if a wire is broken internally. Set your multimeter to the continuity setting, which usually has a symbol that looks like a sound wave or a diode. With the circuit powered off and disconnected, touch one probe to each end of the wire you are testing. A continuous beep confirms the wire is intact. Silence means there is a break somewhere in the wire.
Understanding Voltage Drop Testing
This is a crucial test for finding hidden resistance from corrosion or a poor connection that a continuity test might miss. As noted by automotive resources like AA1Car, a voltage drop of more than 0.1 to 0.2 volts across a wire or connection indicates a problem. To perform the test, the circuit must be active and under load (e.g., turn the headlights on). Set your DMM to a low DC voltage setting. Place one probe at the beginning of a wire (like the battery positive post) and the other probe at the end of that same wire (like the input to the fuse box). A reading of nearly zero is perfect. Any significant voltage reading reveals resistance that is stealing power before it gets to the component. A healthy electrical system is a core part of vehicle longevity, a topic we explore in our guide on how to keep your car’s engine running for years.
Troubleshooting Common Electrical Failures
Now let’s apply these diagnostic principles to common real-world scenarios. By combining the symptoms with the tests, you can create a logical path to the solution.
Scenario: The Car Won’t Start
This is the ultimate electrical failure. First, perform a static battery voltage test. If the battery is low (below 12.4V), the problem is likely a dead battery or a charging issue. If the battery is good, listen carefully when you turn the key. A single, sharp click points to the starter system. Have an assistant turn the key to “start” while you test for voltage at the small signal wire on the starter solenoid. If you see 12V but the starter does not engage, the starter motor itself has likely failed. If you do not see voltage, the problem is upstream in the ignition switch or a safety interlock.
Scenario: Dim or Flickering Lights
This classic symptom almost always points to a failing alternator or a bad ground connection. With the engine running, test the alternator’s output at the battery. A reading below 13.7V confirms the alternator is not keeping up with demand. If the charging voltage is good, perform a voltage drop test on the main ground connections: from the negative battery terminal to the chassis, and from the chassis to the engine block. A significant voltage drop on a ground cable indicates a corroded or loose connection that is restricting current flow.
Scenario: A Specific Accessory is Dead
Whether it is a power window, the radio, or a heated seat, the logic is the same. First, check the fuse for that specific circuit. If the fuse is good, the next step is to access the component’s electrical connector. With the switch for the component activated, use your multimeter or test light to confirm if both power and ground are present at the connector. If you have both, but the component does not work, the component itself (like the window motor) has failed. If either power or ground is missing, the problem lies in the wiring or the switch. This diagnostic logic applies to any vehicle, from a family SUV to a work truck. Understanding these common failure points is useful, similar to the comparisons we make in our Chevrolet Tahoe vs. Ford Expedition analysis.
Scenario: The Battery Drains Overnight (Parasitic Draw)
If your battery is constantly dead in the morning but tests fine, you likely have a parasitic draw, meaning a circuit is staying on when it should be off. To find it, set your multimeter to measure Amps (usually the 10A setting). With the car completely off, disconnect the negative battery cable. Connect the multimeter in series between the disconnected cable and the negative battery post. A normal draw should be very low, typically under 50 milliamps (0.05A). If you see a higher reading, something is drawing power. Go to the fuse box and start pulling fuses one by one. When the amperage reading on your meter drops significantly, you have found the faulty circuit.
Making Safe and Lasting Wiring Repairs
Finding the problem is half the battle; fixing it correctly ensures it does not return. A proper automotive wiring repair is about more than just reconnecting a wire. It is about creating a connection that is mechanically strong, electrically sound, and durable enough to withstand the harsh environment of an engine bay. Avoid the amateur “twist and tape” method at all costs; it is an unreliable fix waiting to fail.
Follow these steps for a professional-quality repair:
- Clean All Connections: If you are working with corroded battery terminals, start by cleaning them. A dedicated battery terminal brush and a paste made from baking soda and water will neutralize the acid and scrub away the corrosion. Rinse with a small amount of water and dry thoroughly.
- Strip the Wire Correctly: Use a quality wire stripper and select the notch that matches your wire’s gauge. A proper strip will cut through the insulation cleanly without nicking or cutting any of the copper strands inside. Damaged strands create resistance and weaken the wire.
- Join Wires Securely: The best method for joining two wires is using a butt connector. Slide the stripped end of each wire into the connector and use a dedicated crimping tool to create a firm, secure crimp. A good crimp forms a cold weld between the wire and the connector.
- Weatherproof the Repair: This step is critical for longevity. Before you crimp the connector, slide a piece of adhesive-lined heat shrink tubing over one of the wires. After the connection is made, slide the tubing over the center of the butt connector and use a heat gun to shrink it down. The tubing will create a tough, waterproof seal that prevents moisture and corrosion.
- Route and Secure the Repaired Wire: Neatly route the repaired section of wire alongside the existing harness. Use zip ties to secure it, ensuring it is kept far away from hot exhaust components, sharp metal edges, and any moving parts like belts or steering linkages. As noted by resources like Marlow Automotive, a systematic approach is key, and that includes finishing the job cleanly.
Knowing When to Call a Professional
Part of being a smart DIY mechanic is knowing your limits. The goal is to save time and money on manageable jobs, not to get in over your head on a complex repair that could compromise your vehicle’s safety. Recognizing when to put the tools down and call a professional is a strategic decision, not a defeat.
Here are clear situations where seeking professional help is the best course of action:
- Complex Safety Systems: Never attempt to diagnose or repair components related to the airbag system (SRS), anti-lock brakes (ABS), or modern Advanced Driver-Assistance Systems (ADAS). These systems are complex and have specific diagnostic procedures. Improper work can be extremely dangerous or render them useless when you need them most.
- Onboard Computer Issues: If you suspect a problem with the Engine Control Unit (ECU), Body Control Module (BCM), or other onboard computers, this is a job for a pro. These modules require expensive, manufacturer-specific scan tools and software to diagnose and reprogram.
- Highly Intermittent ‘Gremlins’: If a problem is so random that you cannot reproduce it with a wiggle test or other methods, it can be nearly impossible to find with basic tools. A professional technician can use advanced tools like a lab scope to monitor circuits and catch the momentary fault in the act.
- Shorts Within Complex Harnesses: Tracing a short circuit or a broken wire that is buried deep inside a large, tightly wrapped wiring harness—like the one under your dashboard—is incredibly time-consuming and can feel like finding a needle in a haystack without extensive experience.
By tackling the basics yourself, you gain a better understanding of your vehicle. And if you do need to go to a shop, you can provide the technician with your diagnostic findings, which can help speed up their work and potentially lower your final repair bill. This is especially true for complex vehicles, a factor we consider in our guide to the best used luxury SUVs that won’t destroy you on repairs. Knowing your limits ensures the job gets done right.