Understanding Your Car’s Basic Health Signals
Before any warning light flickers to life, your car is already communicating with you. Think of it like a doctor checking a patient’s vital signs. The most valuable diagnostic tools you have are your own senses: your eyes, ears, and nose. Learning to interpret what your car is telling you through these senses is the first and most important step in proactive car care. It’s about building an intuition for your vehicle, noticing subtle shifts before they become major problems. This is the foundation of basic car troubleshooting.
The Importance of Sensory Checks
The key isn’t just noticing sounds or smells, but noticing a change. Your car has a normal rhythm, a baseline of hums, clicks, and vibrations. When that baseline changes, it’s often the first signal that something needs attention. Did a smooth ride suddenly develop a slight shudder? Is there a new vibration in the steering wheel at a certain speed? These subtle shifts are your car’s early cries for help. A quick walk-around before you drive, looking for drips on the pavement or checking that your tires look evenly inflated, can prevent a breakdown down the road. Paying attention to these details transforms you from a passive driver into an informed owner.
Decoding Common Automotive Sounds
Cars make a symphony of noises, and learning to identify a few discordant notes can save you a lot of trouble. You don’t need to be a mechanic to start recognizing these patterns. It’s like learning a few key phrases in a new language. Here are some of the most common sounds and what they often mean:
- A high-pitched squeal when you brake: This is often the sound of the built-in brake wear indicators. These small metal tabs are designed to make noise when your brake pads are getting thin, telling you it’s time for a replacement.
- A rhythmic clicking or popping when you turn: If you hear a consistent clicking sound that gets faster as you accelerate through a turn, it’s a classic sign of a worn Constant Velocity (CV) joint, which is part of the axle.
- A metallic grinding or growling noise: This sound, especially when braking, is a serious warning. It usually means your brake pads are completely worn away, and now metal is grinding against metal. This is not only unsafe but is also damaging your brake rotors, making the repair more expensive.
- A whining or howling sound from under the hood: This can point to a few things, like a failing power steering pump, a bad water pump, or a worn-out alternator bearing. The pitch might change as you rev the engine.
Translating Common Automotive Smells
Your nose can be an equally powerful diagnostic tool. Certain smells are unmistakable indicators of specific problems. If you notice any of these, it’s time to investigate:
- Sweet, maple syrup smell: This is the distinct scent of engine coolant (antifreeze). A leak in the cooling system, from a hose to the radiator itself, is the likely culprit. Since the cooling system is critical, this smell should never be ignored.
- Burning carpet or acrid chemical smell: This often points to overheated brakes. It can happen after hard braking down a steep hill, but if you smell it during normal driving, it could mean a brake caliper is stuck.
- Burning oil smell: If you smell hot or burning oil, it likely means oil is leaking onto a hot part of the engine, like the exhaust manifold. You might even see a little blue smoke.
- Rotten eggs or sulfur smell: This unpleasant odor is a sign that your catalytic converter may be failing. It’s not converting hydrogen sulfide in the exhaust into sulfur dioxide properly.
The Value of Your Owner’s Manual
We all have that moment of tossing the owner’s manual into the glove box and forgetting about it. But it’s time to reframe how you see that book. It’s not just a boring manual; it’s the ultimate cheat sheet written specifically for your vehicle. It contains the definitive answers to dozens of questions you might have. Wondering what type of oil your engine needs? It’s in there. Not sure what the correct tire pressure is? The manual will tell you where to find the sticker. It details your car’s maintenance schedule, explains what every fuse does, and identifies the type of fluids your car requires. Before you search online or ask a friend, make your owner’s manual the first place you look. It’s the most accurate and reliable source of information you have.
Decoding Your Dashboard Warning Lights
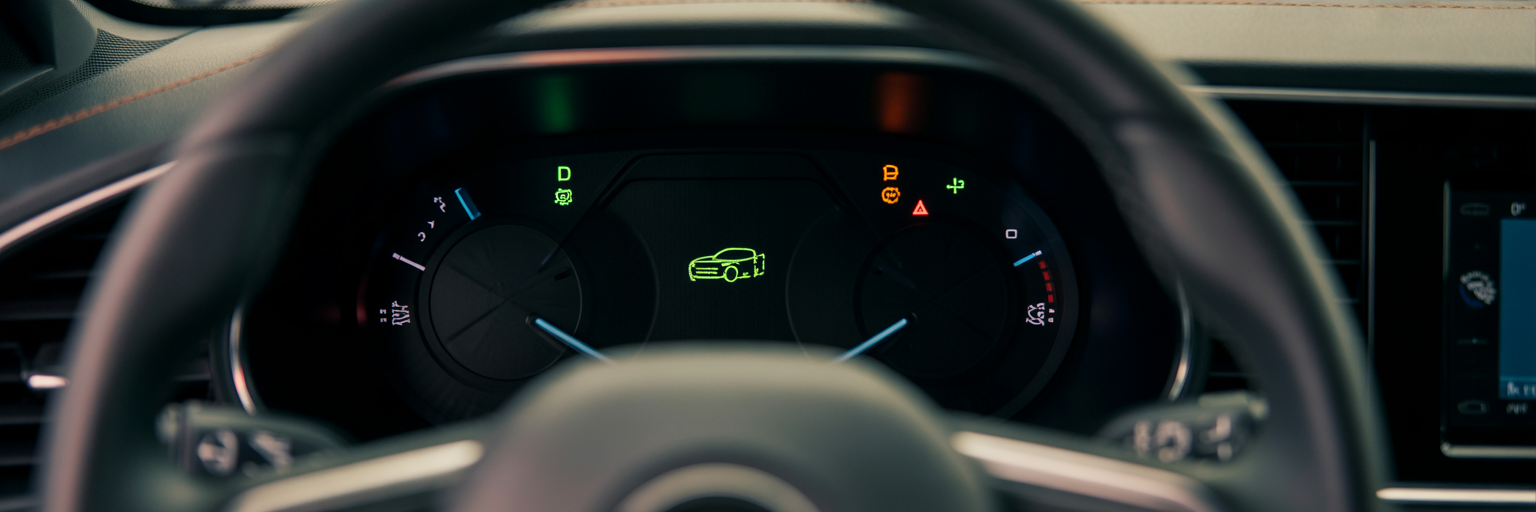
While your senses are great for early detection, your car’s dashboard is the official communication channel for problems. Those little symbols aren’t just decorations; they are a universal language designed to alert you to specific issues. Understanding them is crucial for your safety and your car’s health. This is where you move from proactive checks to reactive diagnosis, and knowing what to do next can be the difference between a minor fix and a major repair bill.
Understanding the Warning Light Color Code
The first step is to recognize the universal color code, which works just like a traffic light. It’s designed to communicate urgency at a glance.
- Green or Blue: These are purely informational. They simply tell you a system is on and working, like your headlights or cruise control. No action is needed.
- Yellow or Orange: This is a caution signal. It means a system needs attention soon. You don’t have to pull over this second, but you should schedule a check-up. The Check Engine Light is the most common example.
- Red: This means stop. A red warning light indicates a potentially serious problem that could affect your safety or cause severe engine damage. If you see a red light, you should pull over as soon as it is safe to do so and turn off the engine.
The Check Engine Light (CEL): What Does My Car Warning Light Mean?
The dreaded Check Engine Light is probably the most misunderstood symbol on the dashboard. It can light up for hundreds of different reasons, ranging from trivial to severe. So, what does my car warning light mean when it’s the CEL? The very first thing you should always check is the gas cap. A loose or faulty gas cap can break the seal on the fuel system, triggering the light. Tighten it, and the light may turn off after a few drives.
However, you must pay attention to how the light behaves. A steady CEL (yellow/orange) is a standard caution. It means the onboard computer has detected a fault, which could be a failing sensor, an emissions issue, or something else. It’s safe to drive, but you should get the codes read by a mechanic or at an auto parts store soon to diagnose the problem.
A flashing CEL is a completely different story. This is a red-level emergency disguised in a yellow light. It signals a severe engine misfire, which means unburnt fuel is being dumped into the exhaust system. This can rapidly destroy your expensive catalytic converter, turning a potential spark plug issue into a four-figure repair. If your CEL is flashing, reduce your speed, pull over immediately, and have your car towed.
Battery and Charging System Light
Many people see the little battery-shaped icon and assume their battery is dead. That’s a common misconception. This light actually indicates a problem with the charging system. It means the alternator is no longer generating power to run the car’s electrical systems and recharge the battery. Your car is now running purely on the finite power stored in the battery. You have a very limited amount of time before the car will shut down completely. If this light comes on, turn off all non-essential accessories like the radio and air conditioning, and drive directly to a safe location or a repair shop. Do not turn the car off until you are there, as it may not start again.
Critical Warnings: Oil Pressure and Coolant Temperature
These two red lights are the most critical warnings your dashboard can show you. They are the true “engine killers,” and they demand immediate action. The Oil Pressure Warning (an old-fashioned oil can) means the engine has lost oil pressure. Without oil, metal components grind against each other, which can destroy an engine in minutes. The Coolant Temperature Warning (a thermometer in liquid) means your engine is overheating. This can lead to catastrophic damage like a warped cylinder head.
The instruction for both of these lights is identical and non-negotiable: pull over safely and shut off the engine IMMEDIATELY. Do not try to “make it home.” Every second the engine runs under these conditions dramatically increases the damage and the cost of repair. Let the engine cool completely before attempting to check any fluids.
Brake System and ABS Lights
Your car has two main brake-related lights. The primary Brake System Warning (often the word “BRAKE” or an exclamation point in a circle) can mean one of two things. The simple one is that your parking brake is still engaged. Always check that first. If the light remains on, it indicates a hydraulic problem in the brake system, such as low brake fluid. This is a serious safety issue that needs immediate inspection.
The ABS Light (the letters “ABS” in a circle) indicates a fault in the Anti-lock Braking System. When this light is on, your normal brakes will still work, but the anti-lock feature will not function in an emergency stop. While you can still drive the car, you should have the system checked out, as ABS is a key safety feature, especially in slippery conditions.
| Warning Light Symbol | Name | What It Means | Recommended Action |
|---|---|---|---|
| Engine Outline | Check Engine Light | A wide range of issues, from a loose gas cap to a sensor failure. | Tighten gas cap first. If light is steady, get it scanned soon. If flashing, pull over immediately. |
| Battery Shape | Charging System Light | The alternator is not charging the battery; the car is running on battery power alone. | Pull over safely. The car will stop running soon. Do not turn it off until you are in a safe place. |
| Oil Can | Oil Pressure Warning | Critical loss of engine oil pressure. This can destroy the engine in minutes. | Pull over and shut off the engine IMMEDIATELY. Check oil level once cool. |
| Thermometer in Liquid | Coolant Temperature Warning | The engine is overheating, which can cause severe damage like a warped cylinder head. | Pull over and shut off the engine IMMEDIATELY. Do not open the radiator cap while hot. |
| Exclamation Point in Circle | Brake System Warning | Could be low brake fluid, or the parking brake is engaged. | Check if the parking brake is fully disengaged. If light remains, have brake fluid and system checked. |
Essential Battery and Electrical System Fixes
Few things are as frustrating as turning the key and getting nothing in return. Fortunately, many common electrical issues are straightforward to diagnose and even fix yourself. This section is your guide to DIY car repair for beginners, focusing on the battery and basic electrical components. With a little knowledge and a focus on safety, you can handle these problems with confidence.
Diagnosing a Weak or Dead Battery
Before a battery dies completely, it usually gives off clear warning signs. Learning to recognize them can help you avoid getting stranded. The most obvious symptom is a slow, groaning start. Instead of a quick “vroom,” you hear a sluggish “rur-rur-rur” as the starter struggles to turn the engine over. You might also notice your interior lights or headlights dimming significantly when you try to start the car. If the battery is almost completely dead, you’ll likely hear a rapid clicking sound from the engine bay, which is the starter solenoid trying but failing to engage. Cold weather is a battery’s worst enemy. The chemical reaction that produces electricity slows down, and engine oil thickens, making it harder to start. This is why batteries that were merely weak in the summer often fail during the first cold snap in places like the American Midwest and Northeast.
Step-by-Step Guide to a Safe Jump-Start
A jump-start is a fundamental skill for any driver. Doing it correctly is simple, but doing it incorrectly can be dangerous. Always follow this procedure for safety. As a resource like the one from AAA highlights, following proper safety protocols is essential to avoid injury or vehicle damage.
- Prepare the Vehicles: Park the working car (the “good” car) close enough for the jumper cables to reach, but do not let the cars touch. Turn both cars off.
- Connect the Positive (+) Cable: Attach one red clamp to the positive (+) terminal of the dead battery. Attach the other red clamp to the positive (+) terminal of the good battery.
- Connect the Negative (-) Cable: Attach one black clamp to the negative (-) terminal of the good battery.
- Make the Final Connection (The Safe Way): Attach the final black clamp to an unpainted metal surface on the engine block or chassis of the car with the dead battery. A bolt or bracket works well. Do not connect it to the negative terminal of the dead battery. This prevents sparks near the battery, which can emit flammable hydrogen gas.
- Start the Cars: Start the good car and let it run for a few minutes. Then, try to start the car with the dead battery. If it starts, you’re good to go.
- Remove the Cables: Disconnect the cables in the reverse order you connected them.
How to Choose and Replace a Car Battery
Replacing a battery is a very manageable DIY job. The first step is getting the right one. Your owner’s manual or an auto parts store’s lookup tool can tell you the “group size” (which dictates the physical dimensions), the required “Cold Cranking Amps (CCA)” (the power to start in cold weather), and the terminal configuration. Getting a new battery is a common first step for new owners, especially for some of the best used cars for first-time buyers under $12,000, as their batteries may be nearing the end of their life.
When you’re ready to swap it, safety is paramount. The most critical rule is the disconnection order. Always disconnect the negative (-) terminal first, and reconnect it last. This prevents you from accidentally creating a short circuit if your wrench touches a metal part of the car while you’re working on the positive terminal. Once the old battery is out, clean any corrosion from the terminal clamps with a wire brush before installing the new one.
Understanding and Replacing Fuses
If a specific electrical component suddenly stops working, like your radio or interior lights, the first thing to check is a fuse. Fuses are the silent protectors of your car’s expensive electronics. They are designed to be a cheap, simple weak point that blows before a power surge can damage a computer or motor. Your car typically has two fuse boxes: one in the passenger compartment (often near the driver’s left knee) and one in the engine bay. Your owner’s manual will have a diagram showing what each fuse controls. You can identify a blown fuse by looking at the small metal filament inside; if it’s broken, the fuse is bad. When replacing it, it is absolutely critical to use a new fuse with the exact same amperage rating. Using a higher-rated fuse can lead to a fire.
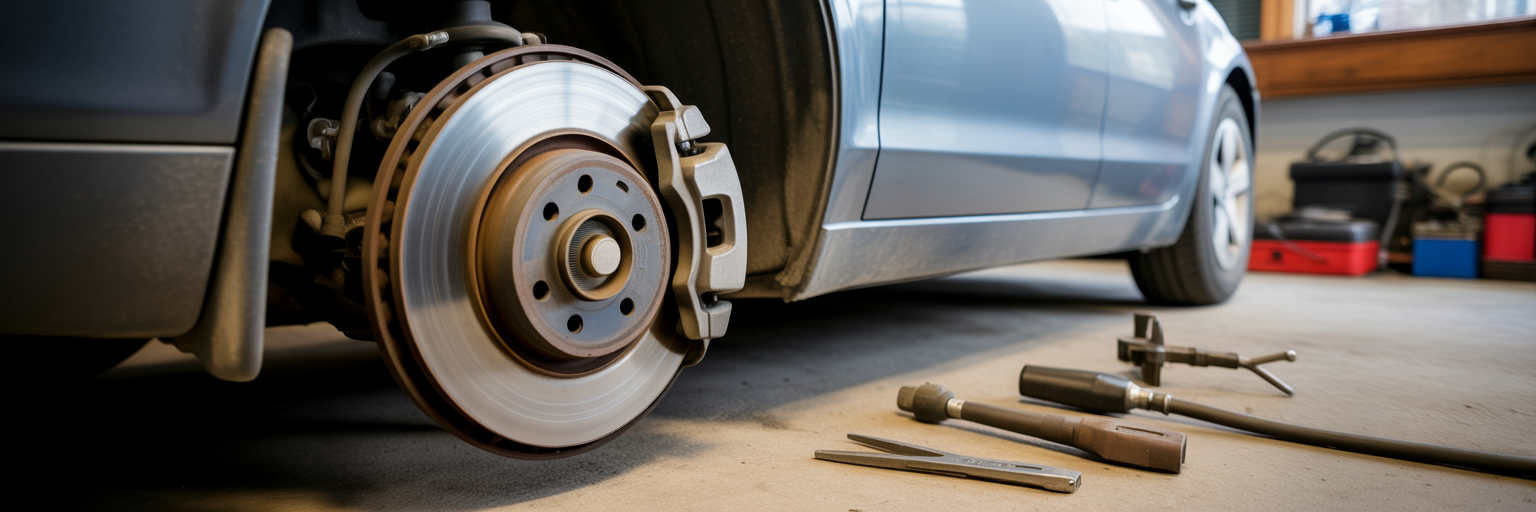
Brake System Checks for Every Car Owner
Few systems on your car are as directly tied to your safety as the brakes. While major brake work is often best left to professionals, every car owner should know how to inspect their brakes and identify warning signs. Understanding the basics of this critical system empowers you to catch problems early and make informed decisions about maintenance. This knowledge is a core part of understanding common car problems and solutions related to vehicle safety.
Identifying Signs of Worn Brakes
Your car will almost always tell you when its brakes need attention. You just have to listen and feel for the signs. We touched on the sounds earlier, but let’s add more detail. The high-pitched squeal is the “early warning” from the wear indicator tab. Think of it as a friendly reminder to schedule service soon. If you ignore it, that squeal will eventually be replaced by a harsh, metallic grinding noise. This is the “final warning.” It means the brake pad material is gone, and the metal backing plate is now grinding against the brake rotor, causing damage with every stop.
Beyond sounds, pay attention to how the brake pedal feels. A spongy or soft pedal that goes further to the floor than usual can indicate air in the brake lines or low fluid. If you feel a vibration or pulsing in the pedal or steering wheel when you brake, it’s often a sign of a warped brake rotor. Finally, if your car consistently pulls to one side when you apply the brakes, it could mean one of the brake calipers is not working correctly.
How to Perform a Visual Brake Inspection
You don’t need to take your wheels off to get a general idea of your brake pad life. With the car parked, you can often get a decent view right through the spokes of your wheels. Find the brake caliper, which is the clamp-like assembly that houses the brake pads and fits over the shiny, disc-shaped brake rotor. Look at the edge of the rotor and find the outer brake pad pressed against it. You want to see how much friction material is left on the pad’s metal backing plate. A new brake pad has a good amount of material, perhaps the thickness of a new pencil eraser. If the material looks very thin, less than a quarter of an inch, it’s time to get them replaced soon.
Understanding Brake Fluid
Brake fluid is the lifeblood of your hydraulic brake system. It’s the incompressible fluid that transfers the force from your foot on the pedal to the calipers at the wheels. Checking it is simple. Locate the brake fluid reservoir under the hood; it’s usually a small, translucent plastic container with “MIN” and “MAX” lines on the side. The fluid level should be between these two marks. The color of the fluid is also important. Fresh brake fluid is clear or light amber. Over time, it absorbs moisture and becomes contaminated, turning dark brown or black. Dark fluid is less effective and can cause corrosion in the brake system, so it should be flushed and replaced by a professional.
DIY vs. Professional Brake Work
So, what can you do yourself, and when should you call a pro? Learning to perform the visual checks and monitor your brake fluid level are fantastic DIY skills that every owner should have. This puts you in control and helps you know when service is needed. However, when it comes to actually replacing brake pads, rotors, or calipers, it’s important to be realistic. This is an intermediate-level job that directly impacts your safety. If you are not completely confident in your mechanical skills and don’t have the right tools, this is a job best left to a trusted mechanic. Proper maintenance of critical systems is a key factor in why some high-mileage cars age better than others, and investing in professional service for safety systems is always a wise choice.
Engine and Fluid Maintenance Essentials
If the engine is the heart of your car, then its fluids are the lifeblood. Performing regular fluid and filter checks is the single most effective thing you can do to ensure a long and healthy life for your vehicle. These simple tasks are the core of any beginner car maintenance guide and require only a few minutes of your time. Don’t be intimidated by what’s under the hood; these checks are designed to be straightforward.
The Engine’s Lifeblood: Checking Your Oil
Engine oil lubricates, cleans, and cools the hundreds of moving parts inside your engine. Running low on oil is one of the fastest ways to cause catastrophic damage. Checking it is a simple process that should become a monthly habit.
- Prepare the Car: Park on level ground and wait for the engine to cool down for at least 10-15 minutes. This allows the oil to drain back into the oil pan for an accurate reading.
- Locate and Pull the Dipstick: The engine oil dipstick usually has a brightly colored handle (often yellow or orange) and is easy to spot. Pull it all the way out.
- Wipe it Clean: Use a paper towel or a clean rag to wipe the entire dipstick clean.
- Re-insert and Read: Push the dipstick all the way back in, making sure it’s fully seated. Pull it out again and look at the tip. The oil level should be between the “MIN” and “MAX” or “ADD” and “FULL” marks.
Also, note the oil’s color. Clean oil is a translucent amber color. As it ages, it will turn dark brown or black. If it looks milky or frothy, it could be a sign that coolant is mixing with your oil, which indicates a serious problem. Regular oil changes are non-negotiable for engine longevity, and you can learn more about this in our guide on how to keep your car’s engine running for years.
Keeping Cool: Coolant/Antifreeze Checks
Your car’s cooling system prevents the engine from overheating. The fluid that does this work is called coolant or antifreeze. Checking its level is easy, but it comes with a critical safety warning: NEVER attempt to open the metal radiator cap when the engine is hot or even warm. The system is under pressure, and opening the cap can release a spray of scalding hot liquid.
Instead, look for the translucent plastic coolant overflow reservoir. This tank will have “HOT” and “COLD” level lines marked on the side. When the engine is cold, the coolant level should be at or above the “COLD” line. It’s a simple visual check that ensures your engine has the resources it needs to stay at the proper operating temperature.
The Simple Power of a New Air Filter
Think of the engine air filter as your car’s lungs. Its job is to prevent dust, dirt, and debris from being sucked into the engine, where it could cause damage. A clogged air filter restricts airflow, which can hurt performance and reduce fuel economy. Replacing it is one of the easiest and most satisfying DIY tasks.
The air filter is housed in a black plastic box in the engine bay, usually connected to a large tube. This box is typically held shut by a few simple metal clips. Just pop the clips open, lift the cover, and you’ll see the old filter. Note its orientation, pull it out, and drop the new one in. It’s a five-minute job that can make a noticeable difference. Don’t confuse this with the cabin air filter, which is a separate filter that cleans the air coming into the passenger compartment.
Topping Off Other Essential Fluids
Beyond oil and coolant, there are a couple of other fluids that are easy for any beginner to check and top off. The simplest of all is the windshield washer fluid. The reservoir is usually a large plastic tank with a symbol of a windshield on the cap. Just pop the cap and pour the fluid in. There’s no risk of overfilling or using the wrong kind.
You can also check your power steering fluid. The reservoir is typically smaller and will be labeled as such. Like the brake fluid reservoir, it will have MIN/MAX lines. If it’s low, check your owner’s manual to ensure you add the correct type of fluid, as using the wrong one can damage the system.
Fundamental Tire Care and Problem Solving
Tires are your car’s only connection to the road, yet they are one of the most commonly neglected components. Proper tire care is not just about longevity; it’s about safety, fuel efficiency, and ride quality. These simple checks take only a few minutes but have a massive impact. Mastering them is a straightforward way to learn how to fix car issues related to handling and performance.
The Tire Pressure Check: Your Best Friend for Safety and MPG
This is the most important two-minute habit you can build as a car owner. Checking your tire pressure once a month can improve your gas mileage, extend the life of your tires, and dramatically improve your car’s handling and braking. To do it, you’ll need a simple tire pressure gauge.
The most critical piece of information is knowing the correct pressure. Here’s a counterintuitive fact for many new owners: the correct pressure is not the number printed on the tire’s sidewall. That number is the maximum pressure the tire can hold. The correct pressure for your specific vehicle is found on a sticker inside the driver’s door jamb or in your owner’s manual. Always check the pressure when the tires are “cold,” meaning the car has been parked for at least a few hours. Simply unscrew the valve cap, press the gauge firmly onto the valve stem, and read the pressure. Add air as needed at a gas station or with a portable inflator.
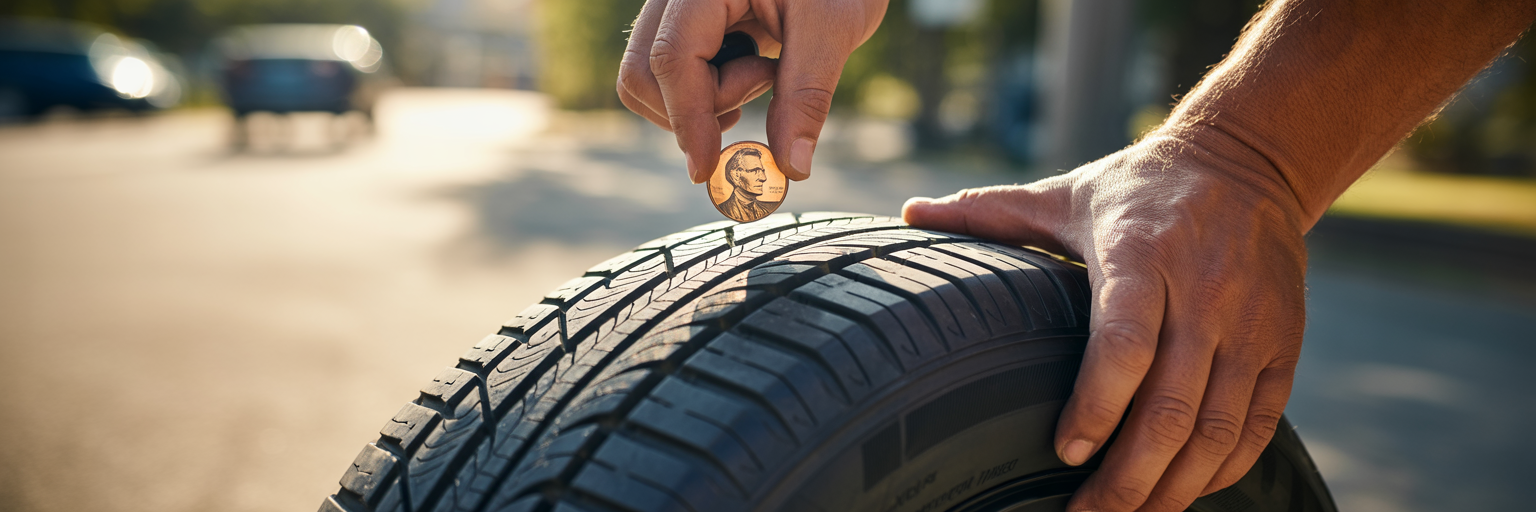
The Penny Test for Tread Depth
How do you know when it’s time for new tires? You don’t need a special tool; all you need is a single penny. The “penny test” is a classic American DIY trick to check your tire’s tread depth. Here’s how it works: take a Lincoln penny and place it into several tread grooves across the tire with Abraham Lincoln’s head pointing down. If you can see the top of Abe’s head, your tread depth is at or below 2/32 of an inch. This is the legal minimum in most states, and it means your tires no longer have enough tread to safely channel water away. It’s time to go tire shopping.
Decoding the Tire Sidewall
The jumble of letters and numbers on your tire’s sidewall can seem intimidating, but it’s just a code that tells you everything about the tire’s size and capabilities. Let’s break down a common example, like P225/60R16:
- P: This stands for “P-Metric,” indicating it’s a tire for a passenger vehicle.
- 225: This is the tire’s width in millimeters from sidewall to sidewall.
- 60: This is the aspect ratio. It means the height of the sidewall is 60% of the tire’s width.
- R: This stands for “Radial,” which is the construction type of virtually all modern tires.
- 16: This is the diameter of the wheel in inches that the tire is designed to fit.
Knowing how to read this code empowers you to be a smarter shopper when it’s time to buy new tires.
Tire Rotation and Alignment Explained
You’ll often hear the terms “rotation” and “alignment,” and it’s important to know they are two very different services. Tire rotation is the practice of moving your tires to different positions on the car, such as moving the front tires to the back and vice versa. This is done to ensure they wear down evenly, which maximizes their lifespan. This is a task that can be done at home with a jack and jack stands, but it’s often done conveniently during an oil change.
Wheel alignment, on the other hand, is not about the tires themselves but about adjusting the angles of the vehicle’s suspension. This ensures that the wheels are tracking perfectly straight. If your alignment is off, you might notice your car pulling to one side or uneven tire wear. This is a professional-only job that requires specialized laser-guided equipment. Knowing to ask for these services is a key part of responsible ownership. For those looking for more informative content, understanding how these services contribute to your car’s longevity is essential.
Frequently Asked Questions for New Car Owners
Stepping into the world of car maintenance can feel like learning a new language. It’s natural to have questions. This section provides direct answers to some of the most common concerns, summarizing key takeaways and giving you the confidence to take the next step.
Q: How do I know if my car needs a mechanic?
A: Trust your instincts and the warning signs we’ve discussed. Any persistent warning light on your dashboard, especially if it’s red or flashing, is a clear signal to see a professional. The same goes for any new and consistent noise, like grinding, whining, or rhythmic clicking. If you notice a significant change in how the car drives, brakes, or handles, or if you spot a puddle of fluid (other than clear water from the A/C) under your car, it’s time to get it checked out. Remember the mantra: “When in doubt, get it checked out.” A small diagnostic fee is a wise investment against a potentially massive future repair bill.
Q: Can I really fix minor car problems myself?
A: Absolutely. The goal of this beginner car maintenance guide is to show you that many tasks are well within your reach. You can confidently handle jobs like checking all your fluids, changing an engine air filter, safely jump-starting a dead battery, checking your tire pressure, and replacing a blown fuse. The key is to start small, always read your owner’s manual, and use the right tools. Never attempt a repair you’re not 100% comfortable with, especially when it involves critical safety systems like brakes, steering, or airbags. Building your skills is a journey, not a race.
Q: How often should I perform my own maintenance checks?
A: Consistency is more important than intensity. A simple, memorable schedule is the best way to stay on top of things.
- Weekly: Perform a quick walk-around. Glance at your tires to see if any look low and look under the car for any new puddles or drips on your usual parking spot.
- Monthly: This is time for the “Big Three.” Check your tire pressure with a gauge, check your engine oil level, and top off your windshield washer fluid.
- Seasonally or Before a Road Trip: Do a more thorough inspection. Check all your fluids (coolant, brake fluid, power steering fluid), test all your lights and wipers, and use the penny test to check your tire tread depth.
Q: What are the absolute essential tools I should keep in my car?
A: You don’t need a rolling toolbox, but having a small, curated kit can turn a potential crisis into a minor inconvenience. Here is a great “Beginner’s Roadside Toolkit”:
- A quality set of jumper cables.
- A reliable tire pressure gauge. Don’t rely on the ones built into gas station air hoses.
- A bright LED flashlight, preferably with extra batteries stored separately.
- A pair of sturdy work gloves.
- Your car’s owner’s manual. It’s the most important tool of all.
- A basic multi-tool or a small wrench and screwdriver set.
- A portable 12V tire inflator that plugs into your car’s power outlet. This is an affordable and highly recommended upgrade that can save you from having to change a tire for a slow leak.